Technical SEO: Site Optimisation for Higher Rankings
July 3, 2025
What Is Technical SEO?
Technical SEO refers to optimizing your website’s infrastructure and backend configuration so that search engines can easily crawl, index, and understand your content.
In other words, it’s about making your site “search engine friendly” from a technical standpoint. This includes improving the site’s architecture, code, and performance to remove any obstacles that may prevent your pages from appearing in search results.
Unlike content SEO (which focuses on keywords and on-page content) or off-page SEO (such as link building), technical SEO addresses behind-the-scenes factors, including site speed, mobile usability, site security, and crawling and indexing directives.
When done correctly, technical SEO enables search engines to find and index your content more efficiently, thereby enhancing your visibility in search results.
Why Is Technical SEO Important?
Technical SEO can significantly impact your SEO performance. You might have the best content in the world, but if search engines can’t access or index your pages, that content won’t rank at all.
For example, if certain pages are blocked from crawling or not indexed, they simply won’t appear on Google, no matter how valuable their content is. This means lost traffic and opportunities.
Furthermore, a site’s speed and mobile-friendliness are confirmed as Google ranking factors.
If your pages load slowly or display poorly on mobile devices, users will likely abandon your site (leading to higher bounce rates), and search engines may interpret that as a poor user experience.
In short, technical SEO ensures your site meets search engines’ requirements for quality and performance. It lays the foundation for all other SEO efforts by ensuring that nothing technical is blocking your site from reaching its full ranking potential.
Site Structure & Navigation: Building an SEO-Friendly Architecture
One of the core elements of technical SEO is your site structure – how your pages are organized and linked together. A logical, well-organized site structure helps crawlers navigate your site efficiently and discover all your important content.
Aim for a “flat” site architecture where each page is only a few clicks away from the homepage. In practice, this means using a sensible hierarchy of categories, sub-categories, and internal links so that no page is too deep or orphaned.
A. Create an SEO-friendly site architecture:
Grouping related content under relevant categories and using internal links generously to connect pages. For instance, your homepage might link to main category pages (or sections), which in turn link to subpages or articles.
This hierarchical linking ensures that crawlers can easily find all pages and also reduces the number of orphan pages (pages with no internal links pointing to them). Orphaned pages are problematic because neither users nor crawlers can discover them through standard navigation.
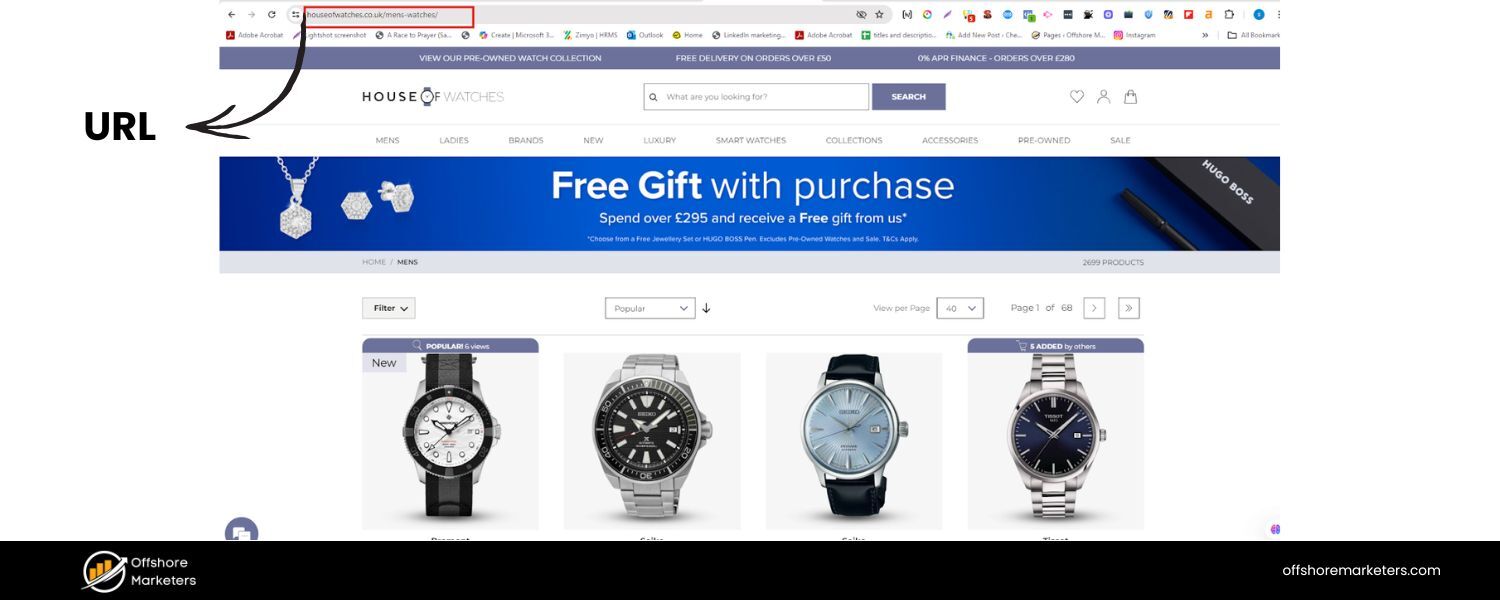
B. Use descriptive, consistent URLs:
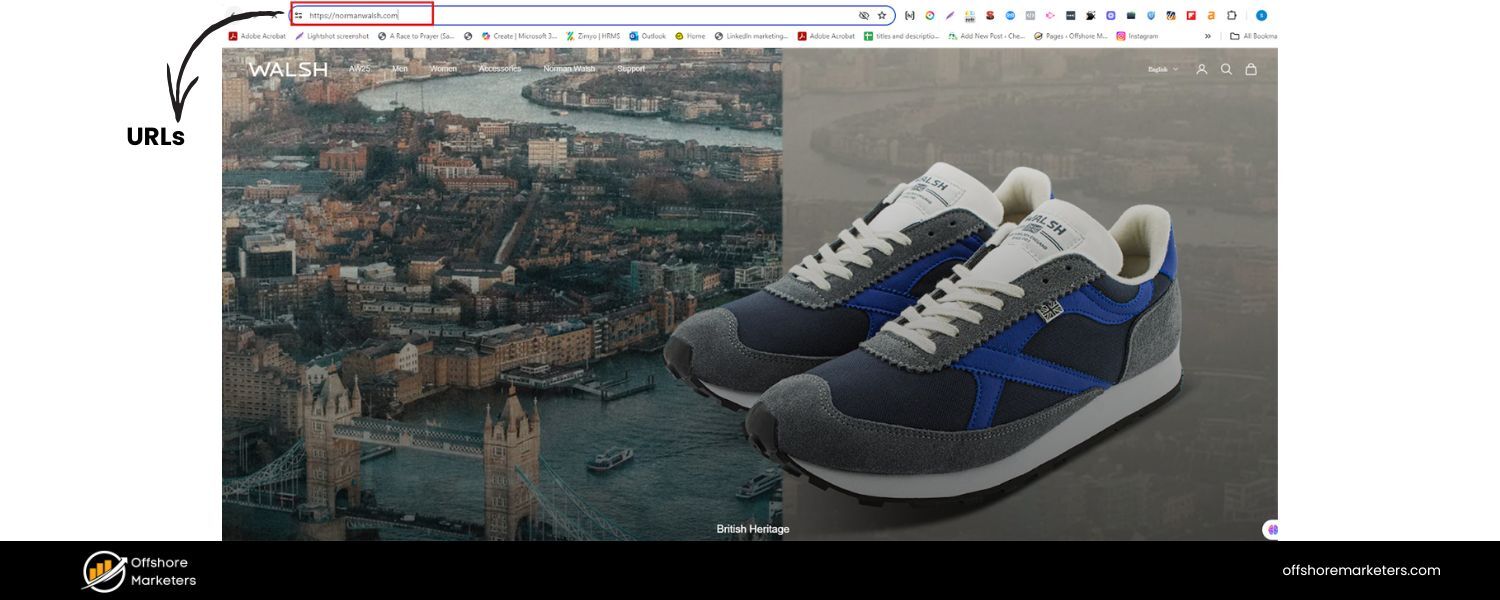 A clean URL structure that reflects your content organization is not only user-friendly but can also help search engines understand context. For example, yoursite.com/blog/technical-seo-basics is more informative than a random ID or query string.
Stick to lowercase letters, use hyphens to separate words, and avoid excessive URL parameters when possible. Consistency in URL structure across your site helps prevent confusion and duplicate content issues.
C. Implement breadcrumb navigation:
 Breadcrumbs are a secondary navigation scheme that shows users (and search engines) the path to the current page (e.g., Home > Blog > SEO > Technical SEO). Using breadcrumb navigation is a proven best practice for usability and SEO.
It not only helps users understand where they are on your site, but also creates contextual internal links.
Google often uses breadcrumb links in search results, which can enhance the appearance of your snippet. Setting up breadcrumbs (usually through your CMS or with schema markup) can give search engines another clear map of your site’s structure.
By building a solid site structure and navigation scheme, you ensure that your content is well-organized and accessible.
A flat, organized structure makes it easy for crawlers to find new pages quickly and effectively spreads “link equity” (ranking power) throughout your site.
It also improves user experience, as visitors can more easily find what they’re looking for, which in turn can improve engagement and SEO signals.
Crawling & Indexing: Ensuring Search Engines Can Find Your Content
Even a perfectly organized site won’t rank if search engines can’t crawl or index your pages.
Crawling is the process by which search engine bots (like Googlebot) traverse your site’s links to discover content, and indexing is when the search engine stores and organizes that content in its database so it can be retrieved for search queries.
Technical SEO involves removing any barriers to crawling and indexing.
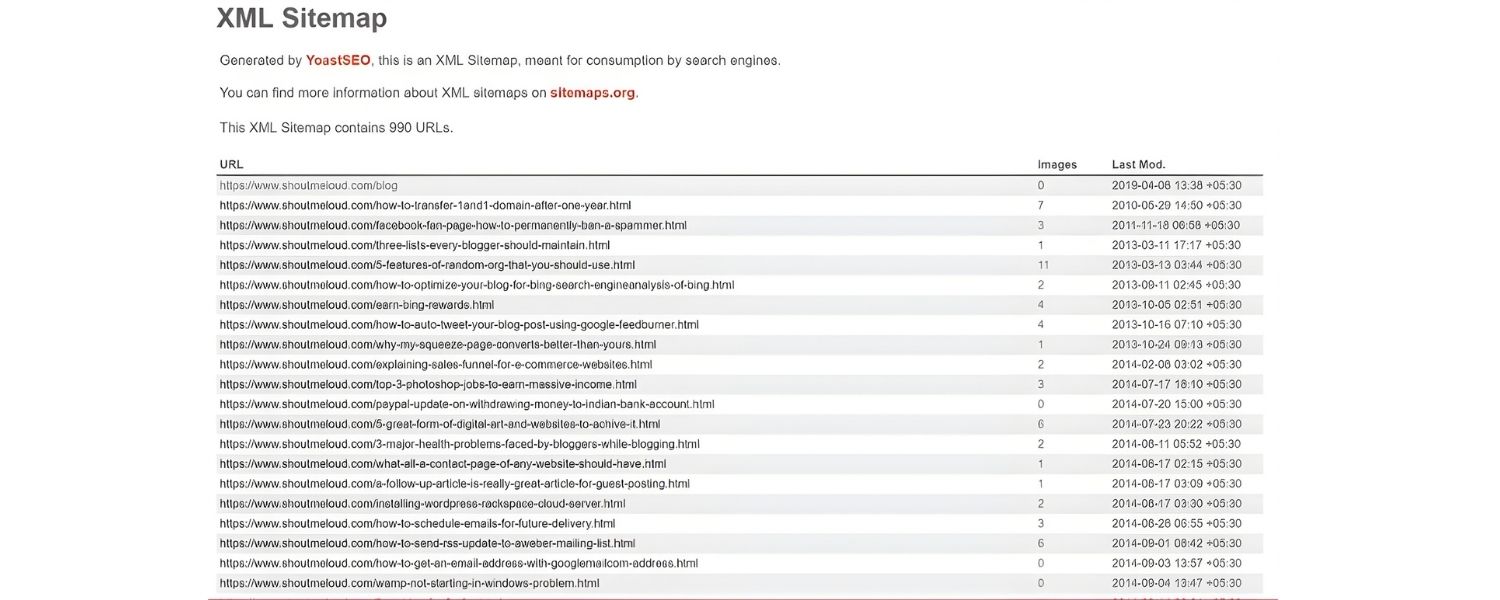
A. XML Sitemaps:
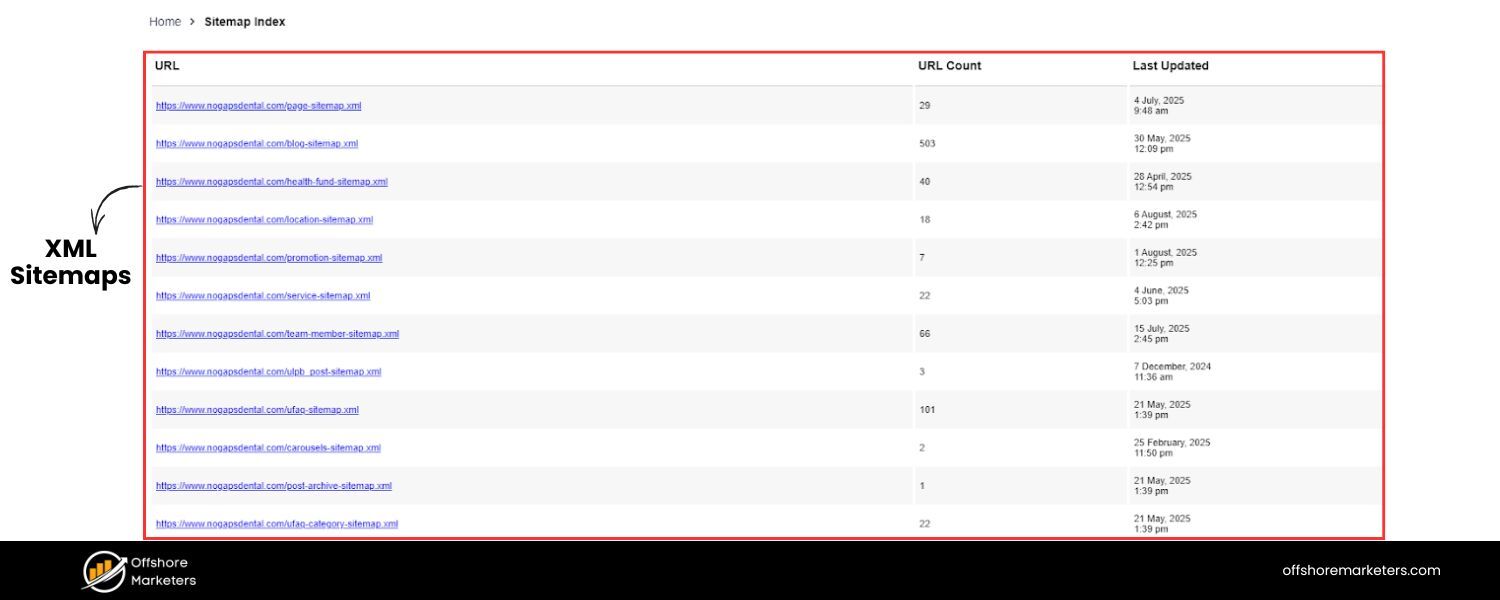 An XML sitemap is essentially a roadmap of your website that lists all the important URLs you want search engines to know about.
Submitting a sitemap helps ensure Google and other engines discover your pages, especially on larger websites or those with poor internal linking. It’s a simple XML file (usually found at yourdomain.com/sitemap.xml or /sitemap_index.xml) that you can generate via your CMS or SEO tools.
Make sure your sitemap is up-to-date and includes canonical versions of URLs. After creating a sitemap, submit it through Google Search Console so that Google can crawl those pages more efficiently.
While Google’s crawlers can often find pages on their own, a sitemap is a valuable backup, especially for very large sites or content that isn’t easily discoverable through links.
B. Robots.txt:
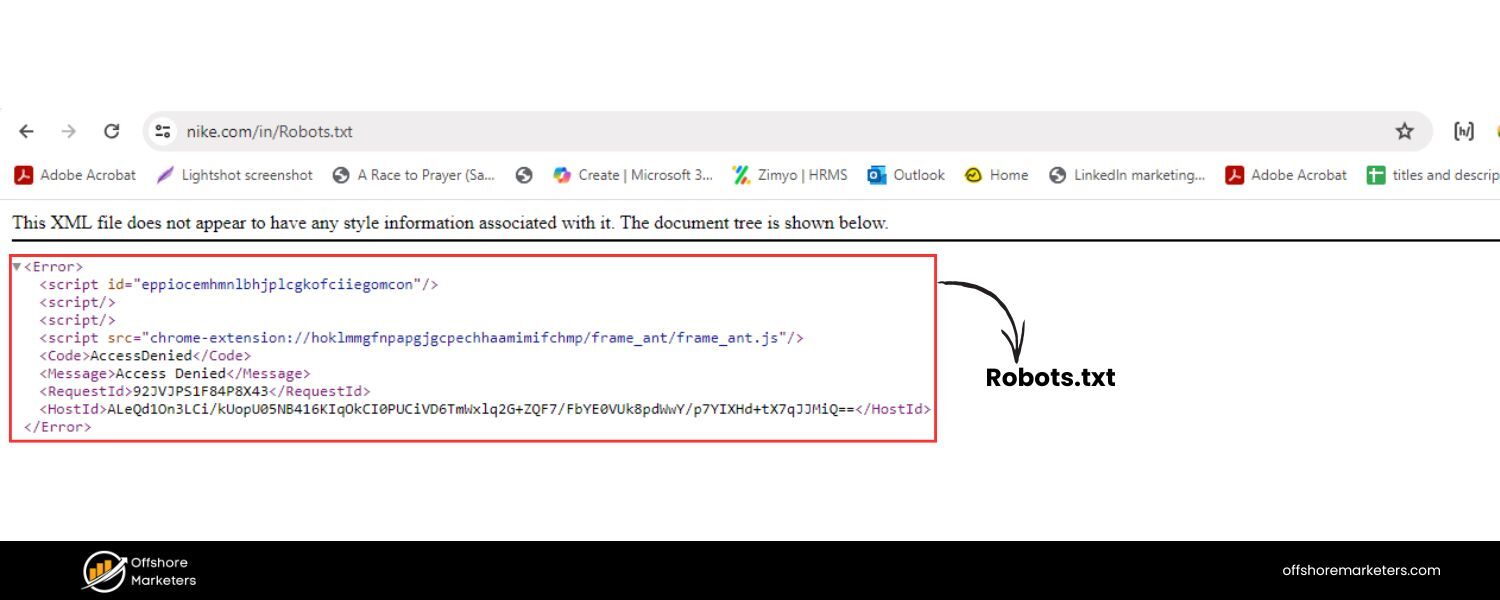 The robots.txt file is a simple text file at the root of your site (e.g., yourdomain.com/robots.txt) that tells search engine crawlers which pages or sections they should not access.
This is useful for blocking search bots from crawling non-public or duplicate sections of your site (like admin pages or stage/test environments). However, misusing robots.txt can accidentally block important content. Regularly review your robots.txt file to ensure you’re not disallowing pages that should be crawled.
For example, you generally would allow all your main content pages and perhaps disallow certain utility pages.
Remember: if a page is disallowed in robots.txt, Google won’t crawl it, which also means it can’t index it (unless it finds links to that page elsewhere, in which case it might index the URL without content).
Use this file carefully and consider alternative methods, such as noindex tags (described below), if you want pages to be indexed but not found via search.
C. Find and fix crawl errors:
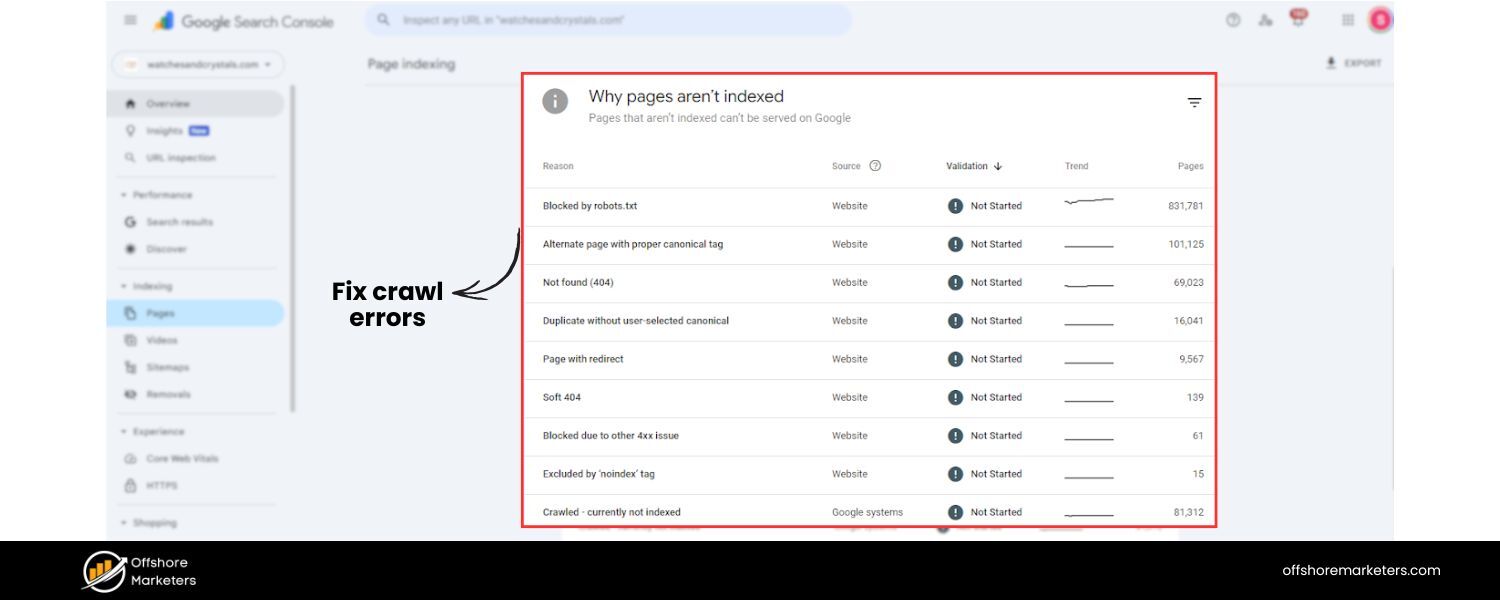 Regularly check Google Search Console (GSC) for crawl errors – these could be broken links (404 Not Found pages), server errors, or other issues that prevent Google from accessing content.
If GSC indicates that Google is having trouble crawling specific URLs, investigate the reason. Perhaps the URL is broken, redirects are not working correctly, or the page is timing out. Fixing these errors (by correcting links or setting up proper 301 redirects) helps maintain a healthy crawl of your site.
Broken pages can negatively affect user experience and waste crawl budget, so it’s best to identify and repair them promptly.
D. Use internal linking to surface deep content:

Pages that are too “deep” in your site (many clicks from the homepage) or not linked at all (orphaned) might not get crawled often, or at all. Mitigate this by auditing your internal links. Ensure that every vital page is linked from a logical location, preferably from a higher-level page.
If you find orphaned pages, add internal links to them from relevant sections. A tool like GSC’s Index Coverage report or third-party crawlers can highlight pages that are discovered but not indexed, which might indicate an internal linking issue.
By adding internal links to these pages, you guide crawlers to them and signal their importance.
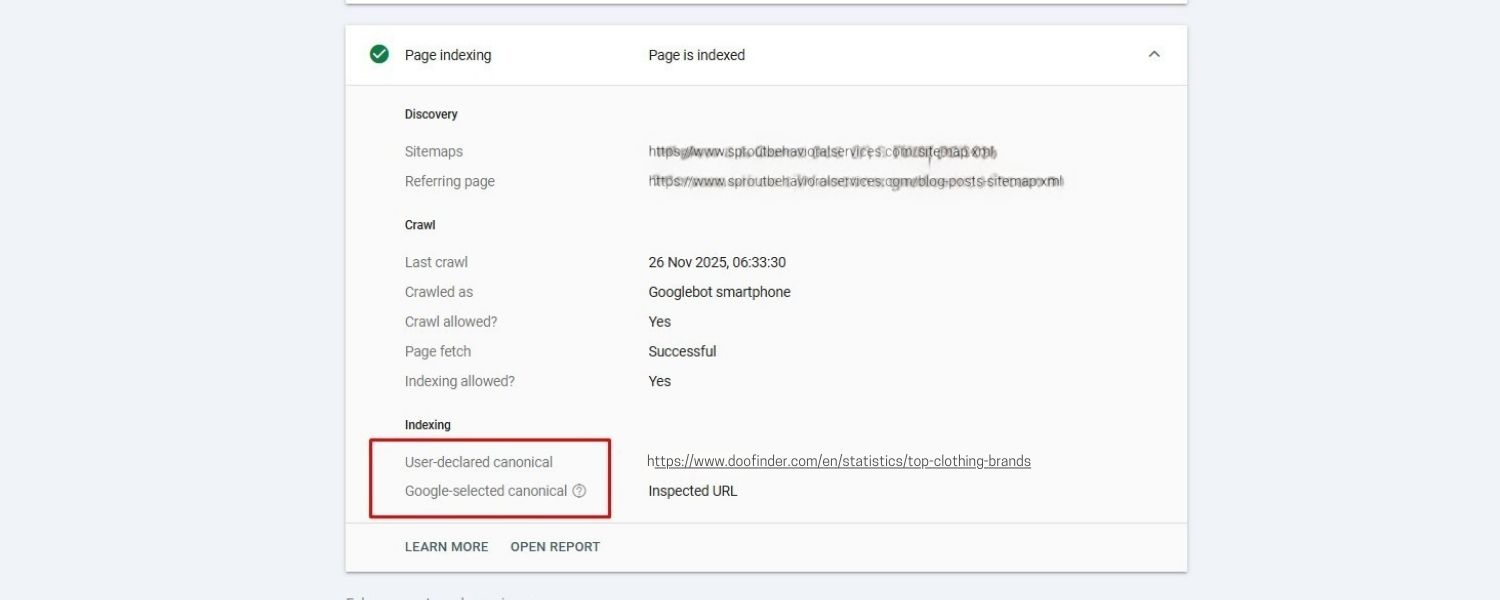
E. Leverage the URL Inspection tool:
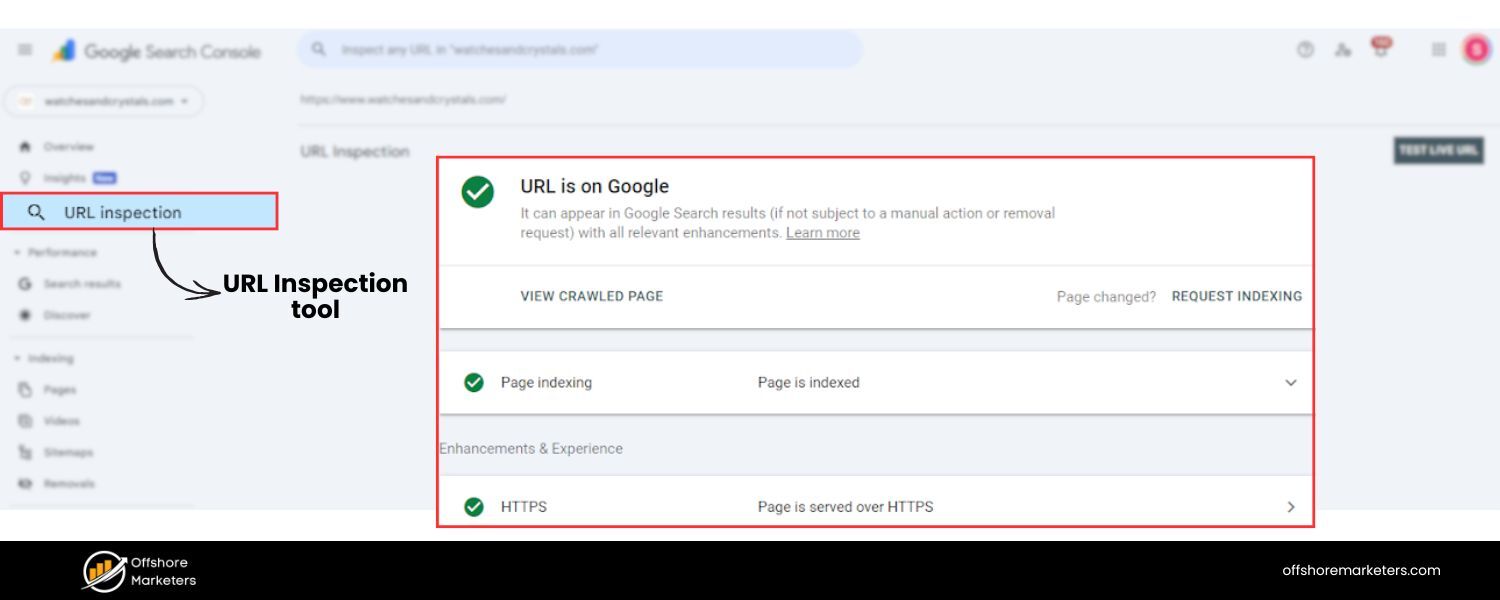 Google Search Console offers a URL Inspection tool, which allows you to test how Googlebot views a specific page. Use this to check pages that aren’t indexing properly.
The tool can indicate whether a page has been crawled, indexed, or if there are issues (such as being crawl-blocked by robots.txt, being noindexed, or having content that is not accessible). You can also request indexing for a URL through this tool if you’ve recently updated a vital page or added new content that you want indexed quickly.
It’s a direct line to Google, telling it “please crawl this page.” If the page still doesn’t index, re-inspect for issues such as whether it might be too similar to another page (duplicate content issues) or whether your site has any manual penalties (although unlikely, it’s worth checking).
F. Avoid unnecessary crawl blockers:
Generally, avoid blocking CSS or JavaScript files that are essential for rendering your page. Google’s crawlers fetch CSS and JS to render (or “see”) the page as a user would.If you block these resources (via robots.txt or other means), Google might not render the page correctly, which could harm indexing and ranking.
Modern websites (especially Single Page Applications or sites heavily built on JavaScript frameworks) should ensure they implement features like Dynamic rendering or server-side rendering, if necessary, so that Googlebot can crawl the content.
Use the URL Inspection tool’s rendered page view to verify that Google can see all your page’s content and links.
If something is missing in the rendered view, that’s a sign you need to adjust how content is delivered (for example, ensure critical content isn’t only loaded after extensive user interactions or via blocked scripts).
By covering these bases, you’ll make it easy for search engines to crawl and index your site.
Think of it like rolling out the red carpet for Googlebot: you’re providing clear directions (sitemap), only slight restrictions when needed (robots.txt), and ensuring no technical hiccups (broken links or blocked resources) stand in the way of indexing.
When search engines can crawl more of your pages and understand them without issues, you increase the chances of those pages ranking for relevant searches.
Thin & Duplicate Content: Canonicalization and Noindex Best Practices
Not all pages on your site are equal in value. Some may contain thin or duplicate content that doesn’t need to rank in search engines.
Technical SEO involves handling duplicate content effectively to prevent confusing search engines with multiple versions of the duplicate content. It also requires pruning or preventing the indexation of low-value pages.
Duplicate content can refer to identical (or very similar) content appearing at multiple URLs.
This could happen for benign reasons – for example, a printer-friendly page and a regular page, or an HTTPS and HTTP version of the same page, or session ID parameters in URLs creating separate versions.
While Google usually doesn’t penalize normal duplicate content, it can hurt your SEO by diluting signals and causing Google to spend time crawling unnecessary pages. Even worse, Google might index the wrong version of a page or split the ranking signals between duplicates.
Here’s how to tackle thin and duplicate content issues:
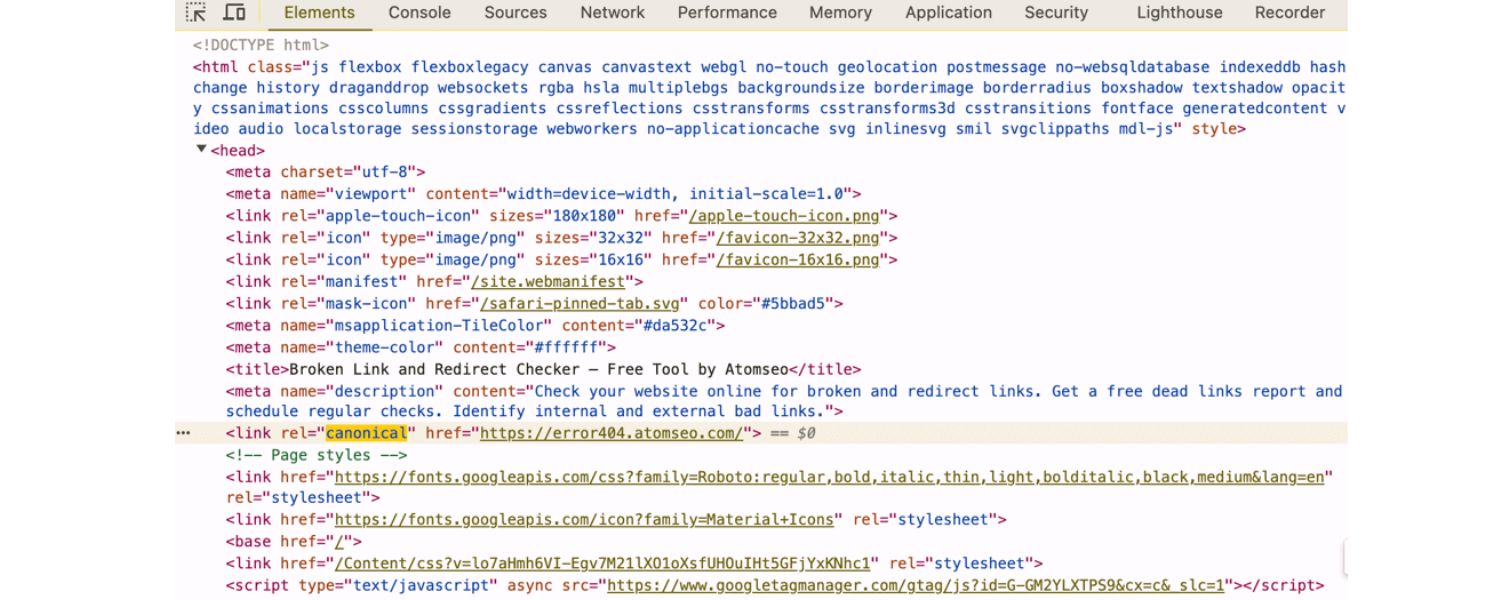
A. Implement Canonical Tags:
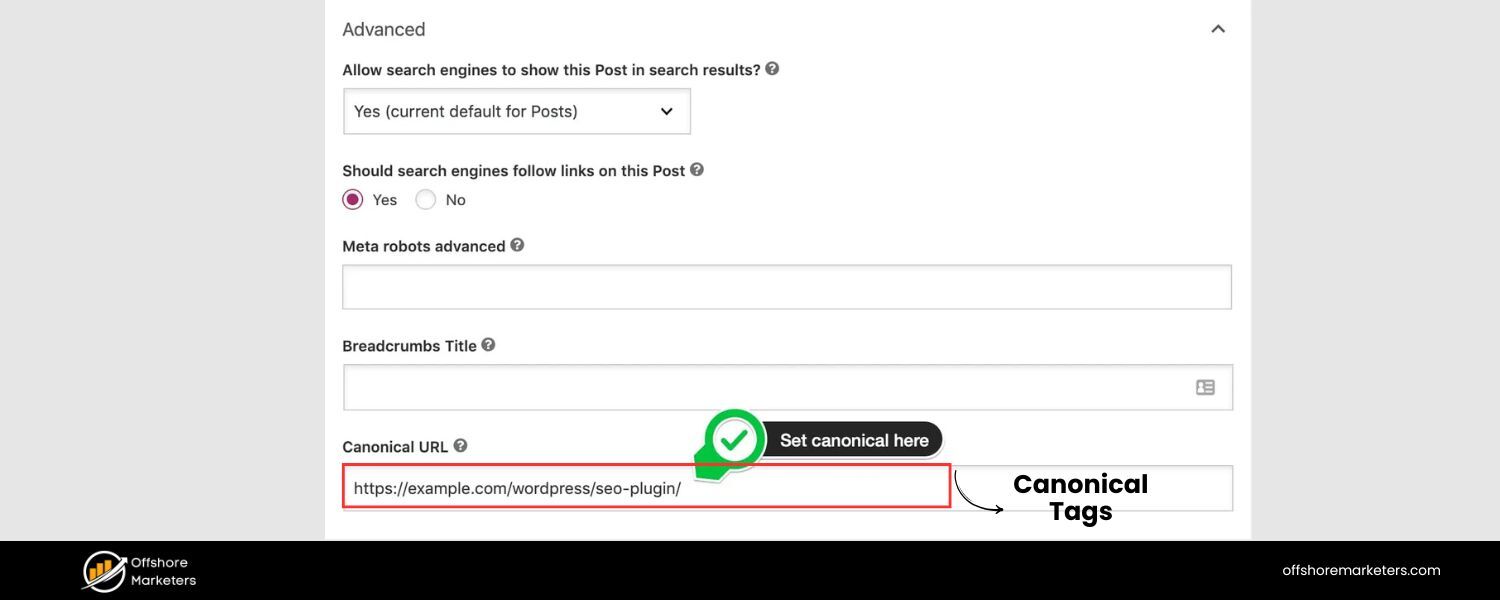
A canonical tag (placed in the HTML of a page) tells search engines which version of a page is the “primary” one that should be indexed. If you have two URLs with very similar content, use a canonical tag on the duplicate URL that points to the main URL. For instance, if both example.com/page and example.com/page?ref=twitter display duplicate content, choose one as canonical (likely the clean version without parameters).
This way, Google knows which page to index and rank and will consolidate ranking signals to that canonical URL. Implementing canonical tags where needed can safeguard you from inadvertently competing with yourself in search results.
B. Ensure a Single Accessible Version of Your Site:
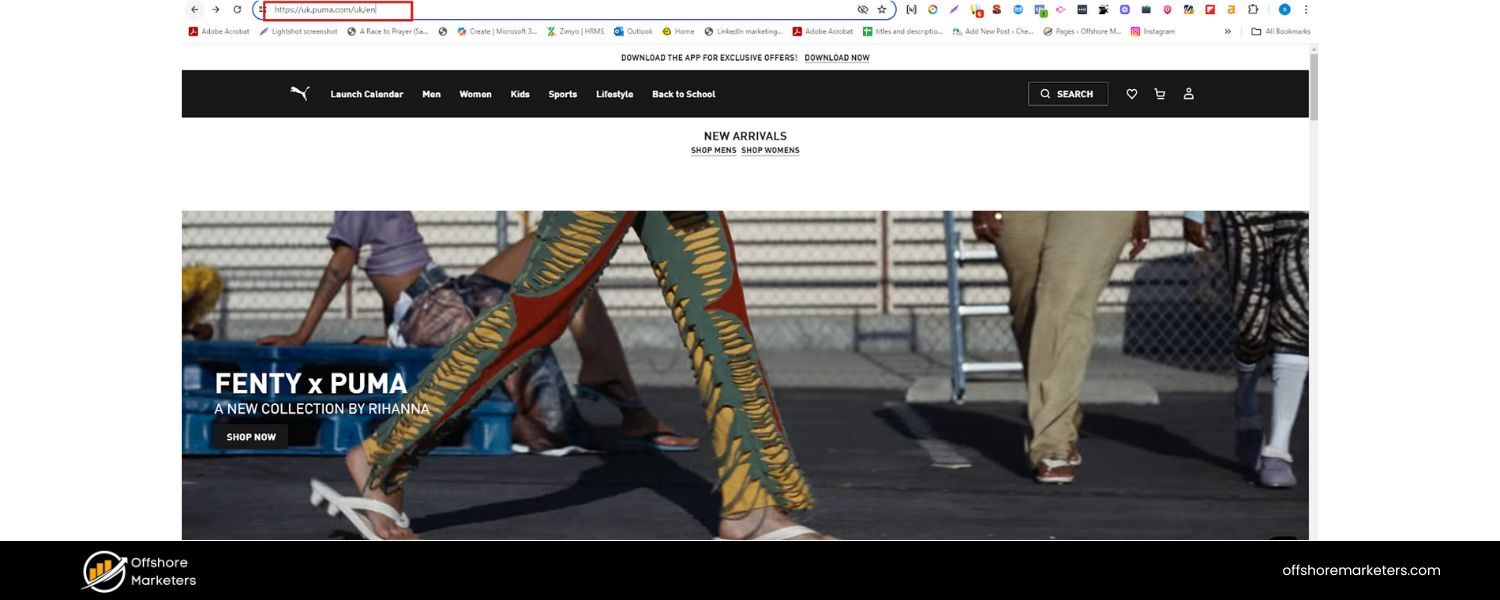 This is a common oversight – your site might be accessible at both http:// and https:// or with and without www (e.g., www.example.com and example.com). If not configured correctly, this can create duplicate versions of every page.
Choose your preferred domain (www or non-www, HTTPS always over HTTP) and redirect all other versions to it. For example, enforce HTTPS sitewide (more on HTTPS later) and set 301 redirects from http:// to https://. Similarly, if you choose https://www.example.com as your primary domain, then example.com (without www) should redirect to it.
This way, users and crawlers only ever see one version, and all link equity flows to a single domain.
C. Use the noindex tag where appropriate:
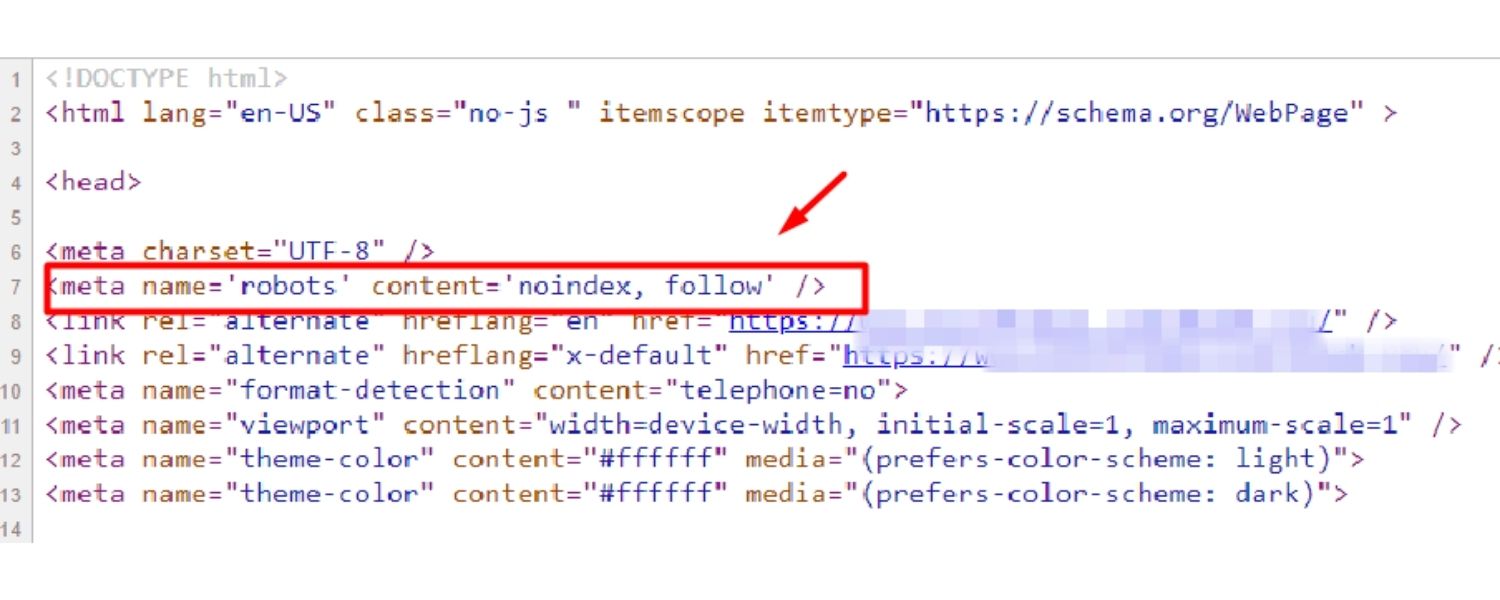
Sometimes, you have pages that you don’t want indexed at all (because they provide no value in search results or could even harm your SEO if indexed). These might include things like thank-you pages, internal search results pages, paginated pages, or duplicate pages that you can’t canonicalize easily.
In such cases, using a meta robots tag with the content attribute set to “noindex” on the page can instruct search engines not to index that page.
This is a powerful tool – for example, many SEO-savvy sites noindex their internal search result pages or WordPress tag archives if those pages are thin.
Use the noindex tag only on pages that you are okay with not appearing in Google at all. Importantly, if a page is noindexed but still accessible to crawlers, Google will crawl it (seeing the noindex directive), but not list it in results.
If you want to both hide a page from search and conserve crawl budget, you might combine a noindex with a robots.txt disallow after Google has seen the noindex once; however, typically just using a noindex is sufficient.
D. Prune thin content:
Thin content refers to pages with very little valid text or value. This might include placeholder pages, pages with just a few sentences, or near-duplicate pages where only a product name or city name changes.
Such pages rarely rank well and can clutter your index. Perform periodic content audits to identify pages with very low word counts or those with shallow content. You have a few options: improve them (add more useful content), merge them with other pages, or noindex/remove them. For example, if you have 10 thin pages on similar subtopics, consider combining them into one robust page.
Removing or noindexing thin pages can lift your overall site quality in Google’s eyes, as you’re effectively saying, “only index my good stuff.”
E. Beware of session IDs and URL parameters:
If your site uses tracking parameters or session IDs in URLs, you might inadvertently create many URLs with duplicate content. Use Google Search Console’s URL Parameters tool or appropriate canonical tags to indicate the primary version.
Alternatively, consider implementing cookies for sessions instead of using URL parameters, or configure your server and analytics to avoid creating indexable URLs for each session.
Similarly, for e-commerce sites with faceted navigation (filters that change URL parameters), use canonical tags or the noindex tag for filtered versions, and maintain one main version of a category page that is indexed.
By handling duplicate and thin content strategically, you send stronger signals to search engines about which pages deserve attention.
You also avoid the scenario of Google indexing pages that don’t help your SEO goals. The result is a leaner, higher-quality indexation profile for your site, which can positively impact your rankings.
Remember: when in doubt, consolidate or eliminate – fewer high-quality pages are better than many low-value pages.
Page Speed & Core Web Vitals: Faster Sites, Higher Rankings
In the era of short attention spans, website speed is crucial for both users and search engines. Google has long indicated that faster-loading sites have an edge in rankings.
As far back as 2010, Google announced that site speed would be used as a ranking factor (initially a minor one) in its algorithm. Since then, the importance of page speed has continued to grow, particularly with the rise of mobile browsing.
A slow website not only frustrates users (leading to higher bounce rates and lower conversions) but also signals to search engines that your site might not provide the best experience.
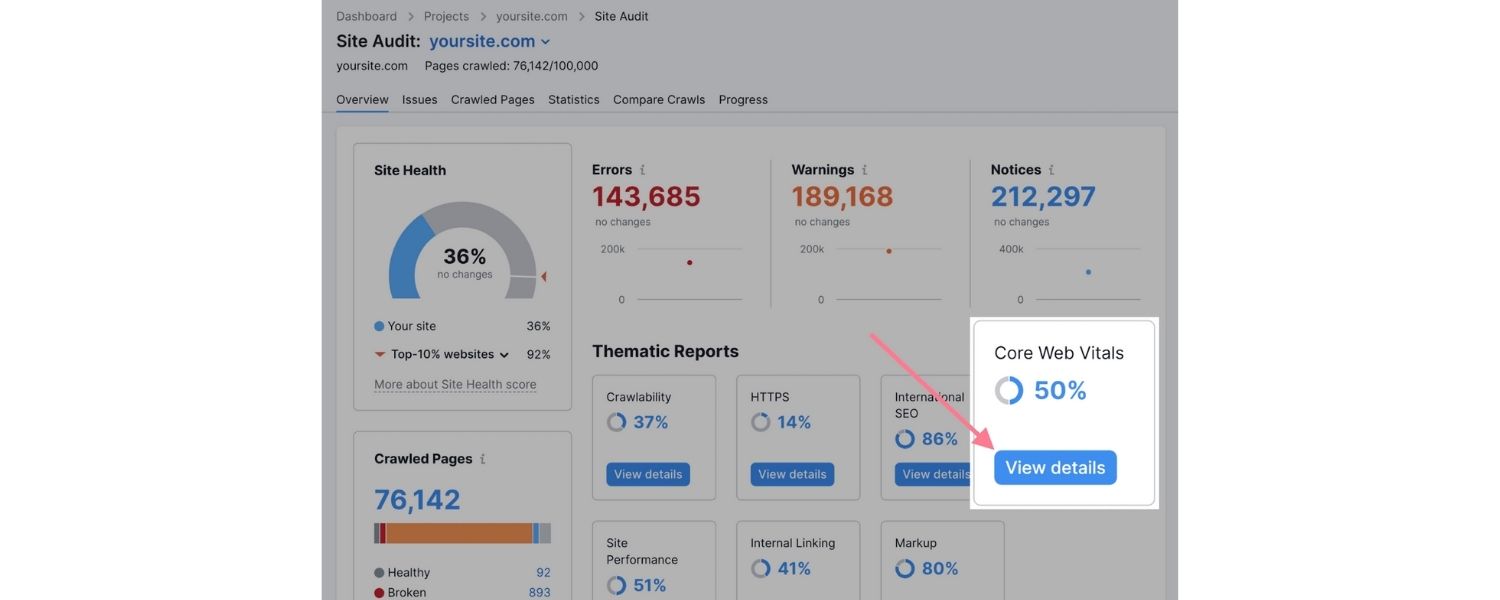
1. Core Web Vitals:
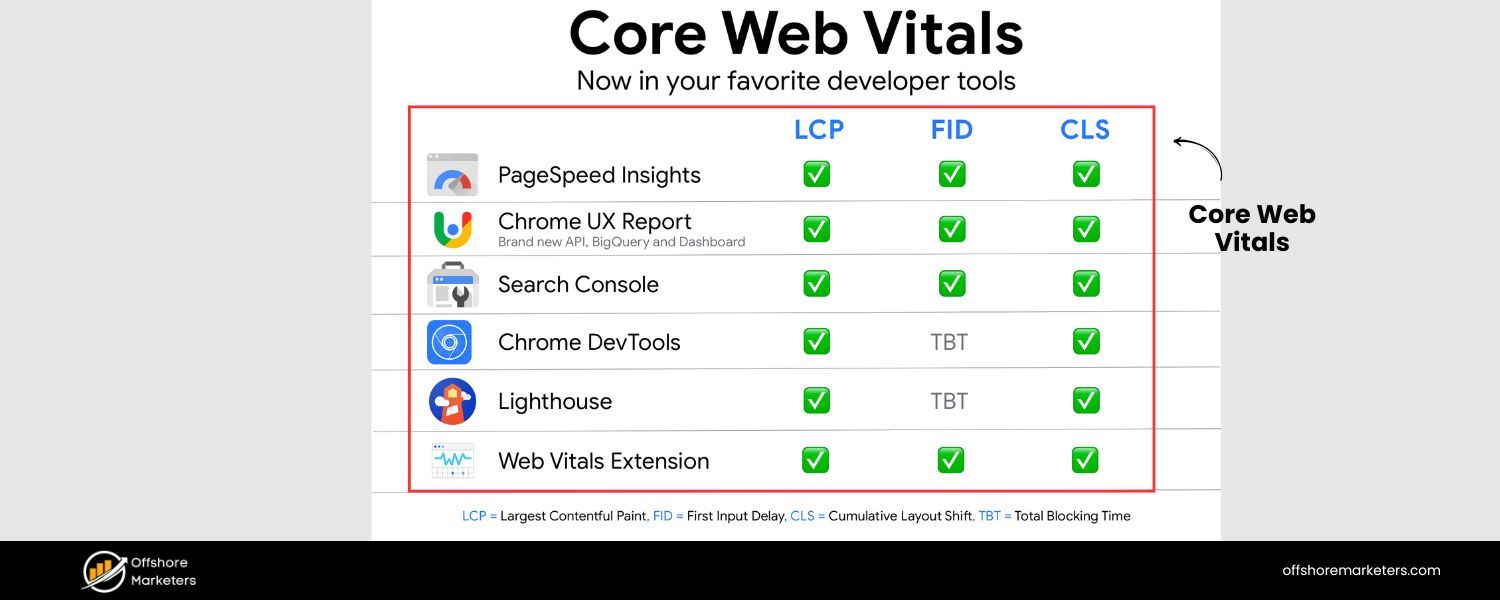
In recent years, Google introduced the Core Web Vitals – a set of specific page speed and user experience metrics that it considers essential.
Core Web Vitals are a subset of page experience signals that measure loading speed, interactivity, and visual stability. As of 2024, the three main Core Web Vitals metrics are:
2. Largest Contentful Paint (LCP):
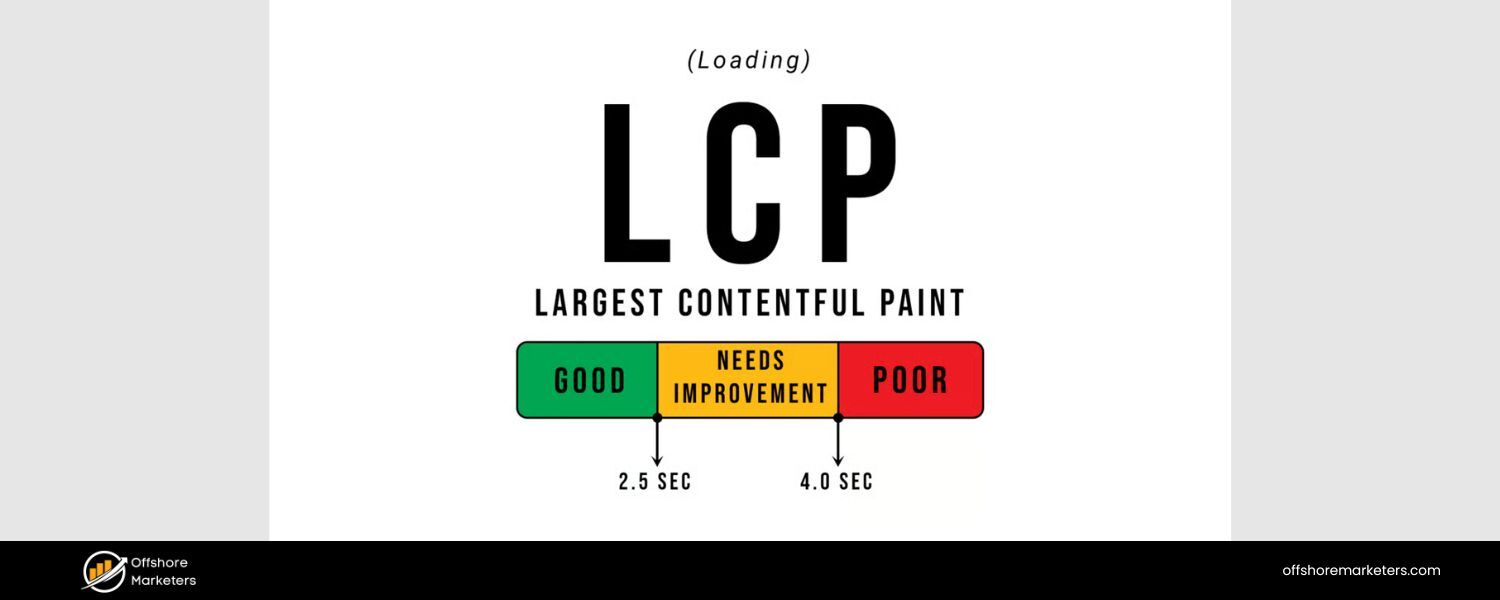
how quickly the main content loads, Interaction to Next Paint (INP) – the responsiveness to user interactions (which in 2024 replaced the older First Input Delay metric), and Cumulative Layout Shift (CLS) – how stable the layout is (to avoid annoying content shifts).
These metrics give a quantifiable way to gauge your site’s performance. Google has stated that meeting the recommended thresholds for these metrics can positively influence your rankings, all else being equal.
Even if the ranking boost is modest, the real benefit lies in user satisfaction – a fast and smooth site keeps people engaged for longer.
Here are key ways to improve your page speed and nail the Core Web Vitals:
A. Optimize and reduce page size:
The larger your pages (in file size), the longer they take to load. Aim to reduce web page size by compressing images (using modern formats like WebP where possible), minifying CSS and JavaScript files (removing whitespace, comments, and unnecessary code), and eliminating bloated HTML.
Often, images are the biggest culprit – use responsive image techniques so browsers don’t download a huge image for mobile screens, and compress images without compromising visible quality. Less weight means faster load, especially on slower networks.
B. Leverage browser caching and CDNs:
Caching enables returning visitors to load your site more quickly by storing specific resources locally, thereby reducing the time it takes to load your site. Set proper cache headers for static resources (images, CSS, JS) so browsers can reuse them on repeat visits.
Additionally, using a Content Delivery Network (CDN) can drastically improve load times for global audiences. A CDN stores copies of your site’s static files on servers around the world, delivering them from the location closest to the user.
This reduces latency. (One caveat: make sure your CDN is correctly configured – a study once found some CDNs, when misconfigured, could worsen load times. Always test before and after implementation.)
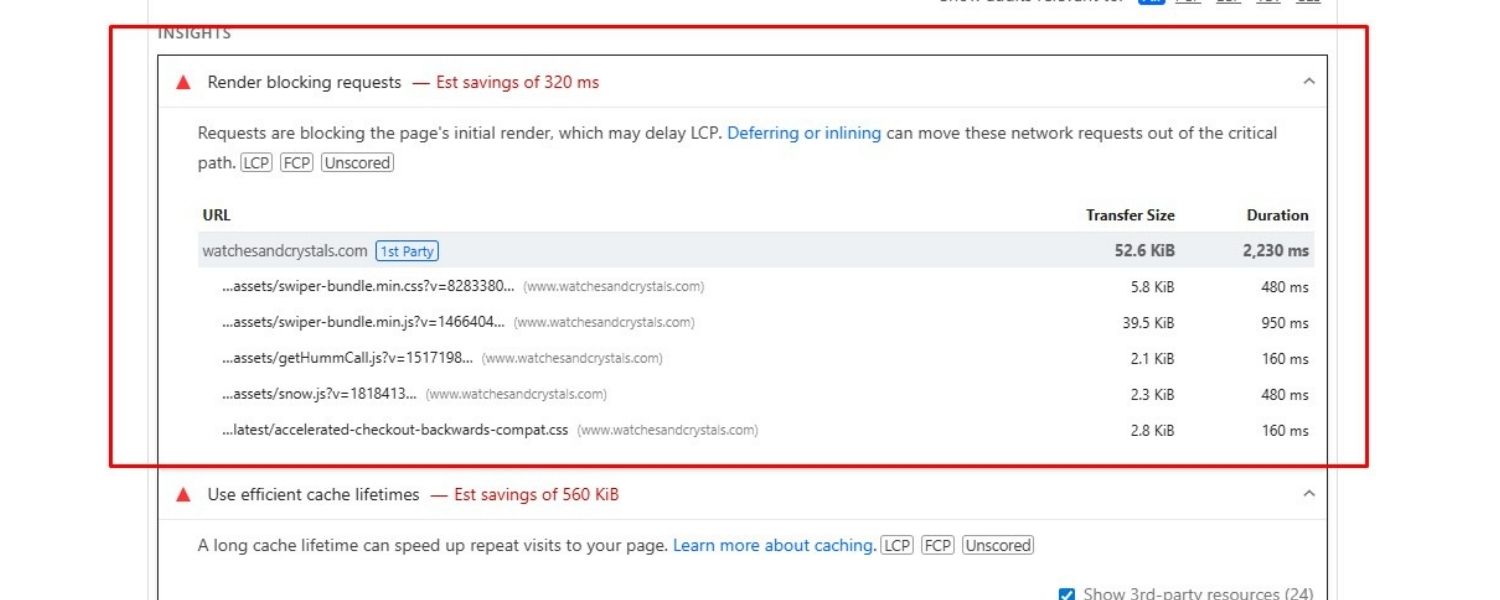
C. Eliminate render-blocking resources:
When a browser loads your page, certain CSS or JS files might block the page from rendering (showing content) until they’re loaded. Identify render-blocking resources and defer or async-load them if possible.
For example, non-critical JavaScript can often be loaded asynchronously (so it doesn’t hold up the page), and CSS can be split into critical (inline the styles needed for the initial viewport) and non-critical (load the rest after).
Each third-party script you include (like analytics, ads, social widgets) also adds load time – be ruthless in cutting any scripts that aren’t providing significant value.
Each third-party script adds on average 34ms to load time, and that adds up. Remove or defer those you don’t need.
D Use modern performance techniques:
Enable GZIP or Brotli compression on your server to shrink file sizes sent over the network. Implement HTTP/2 or HTTP/3 if your server supports it, as these protocols allow multiplexing and faster parallel loading of resources. Also, consider preloading key assets (used for hero images or critical scripts) so the browser knows to fetch them ASAP.
Lazy-load images and videos that are below the fold (not immediately in view) – this means they’ll load only when the user scrolls to them, saving bandwidth and speeding initial load.
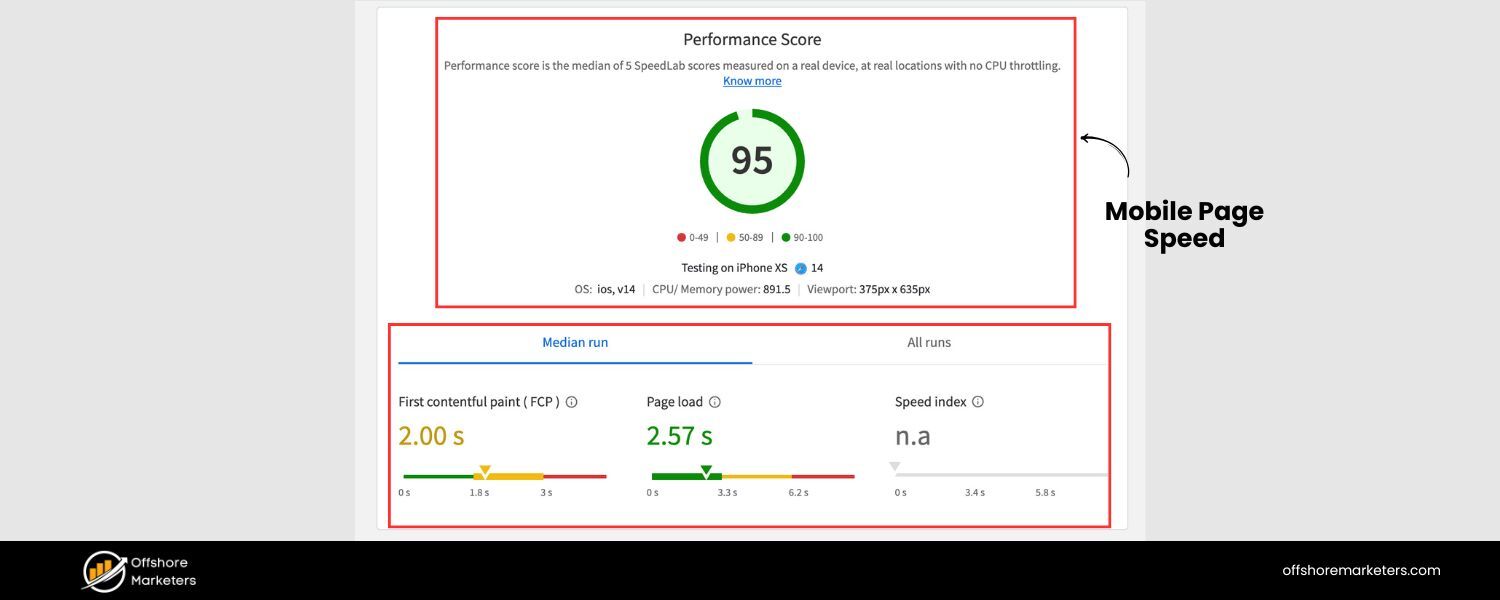
E. Test, measure, and iterate:
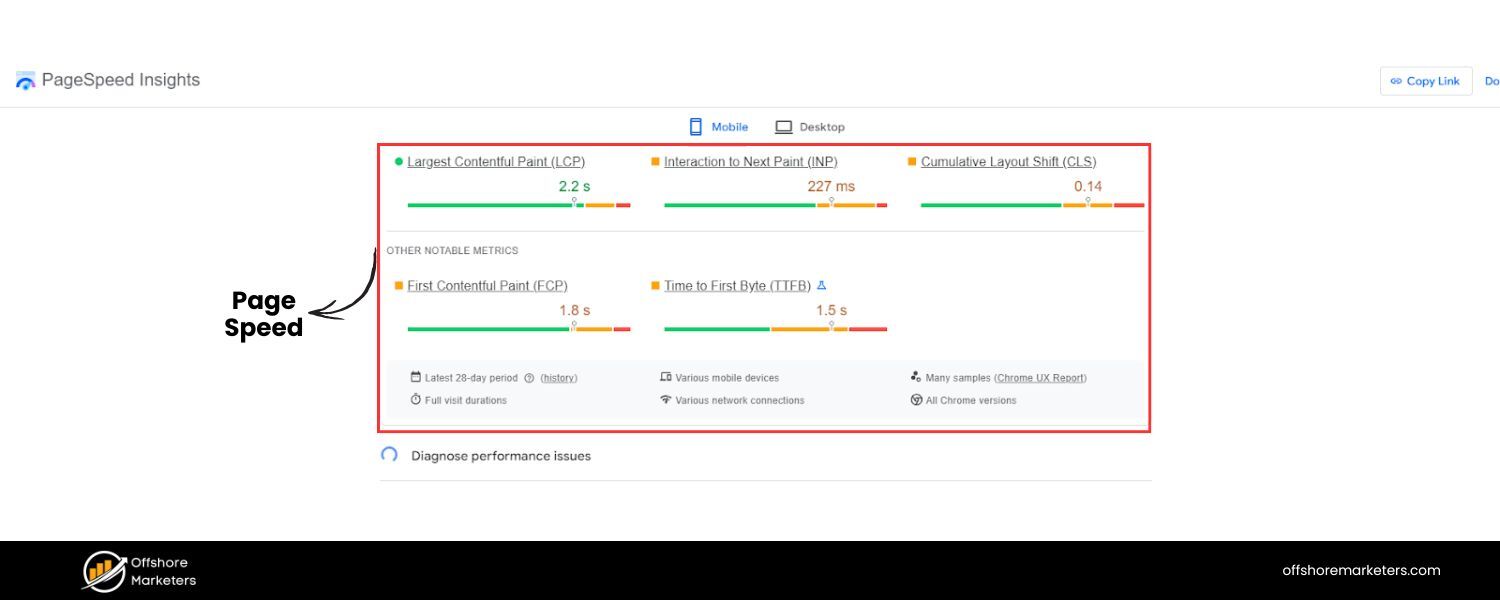
Use tools like Google PageSpeed Insights or Lighthouse (built into Chrome DevTools) to get diagnostics on your site’s performance. These tools will highlight specific issues and provide suggestions.
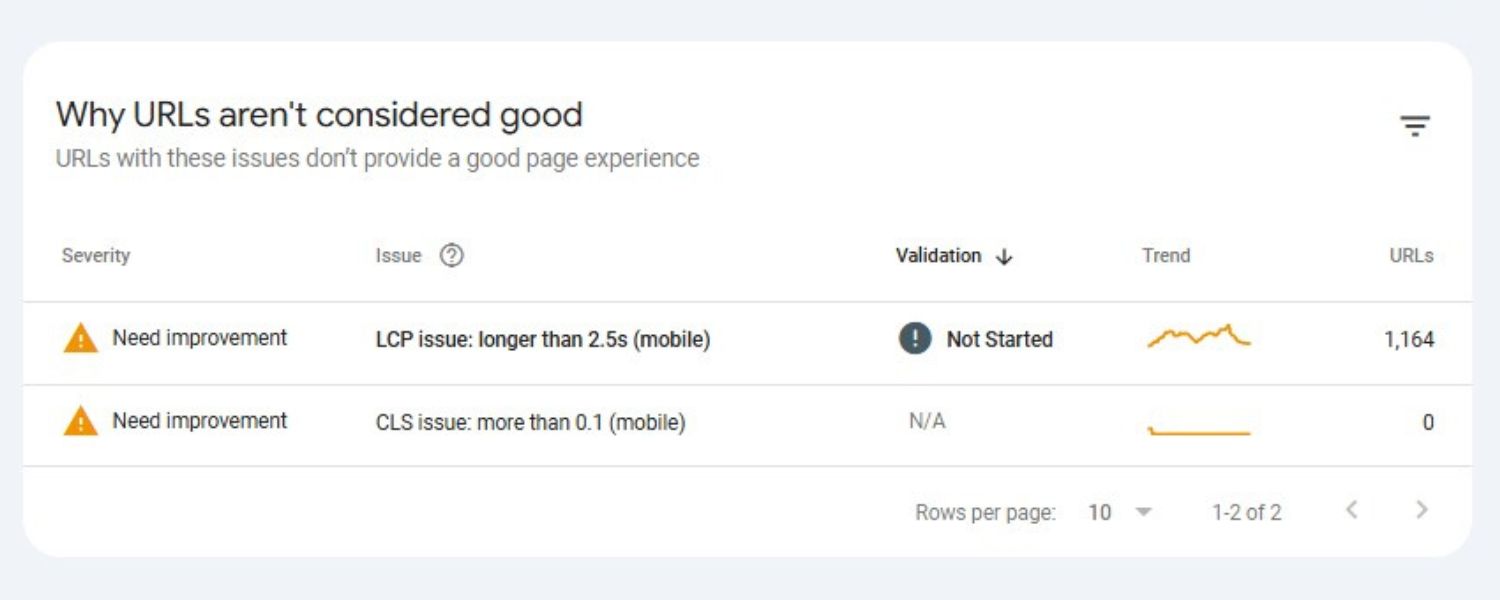
Google’s PageSpeed Insights will also report on your Core Web Vitals, showing whether your page passes the thresholds for LCP, INP (or previously FID), and CLS. Additionally, Google Search Console has a Core Web Vitals report that flags groups of pages with poor CWV metrics.
Treat these tools as your coaches – fix the issues they highlight, then re-test. Often, it’s an iterative process of tuning and retesting.
Investing in page speed pays off not only in SEO but also in improved user engagement and conversion. Users are far more likely to stay on a fast site and interact with it.
Google’s studies have shown that faster sites lead to more time on site and better user satisfaction. And from a purely technical SEO perspective, a fast-loading site means Googlebot can crawl more pages using the same resources (crawl budget).
Faster response times can also help Google crawl deeper into your site during each visit. In short, speed is a win-win: happier users and a happier Googlebot.
Mobile Optimization: Mastering Mobile-First SEO
We live in a mobile-first world, and so does Google. Mobile optimization is no longer optional – it’s essential. Google has transitioned to mobile-first indexing, which means that Google primarily uses the mobile version of your site for indexing and ranking.
This shift was a multi-year initiative that Google completed around 2023, after initially announcing it a few years prior.
Now, if your site’s mobile version is lacking content or functionality that your desktop site has, your SEO could suffer because Google might not see that missing content at all.
What to do to excel in mobile SEO:
A. Responsive design:

Implement a responsive web design that automatically adjusts to different screen sizes and devices. This is Google’s recommended approach to mobile-friendly sites.
It means you serve the same HTML to both desktop and mobile, but use CSS to rearrange and size elements for small screens. With responsive design, you avoid having separate “m.example.com” URLs, which means no issues with duplicate content or complicated redirects.
Make sure important content (text, images, and links) is visible and usable on the small screen. Users shouldn’t have to pinch-zoom to read text or click microscopic buttons.
A mobile-friendly layout uses legible font sizes, tap-friendly buttons, and content that fits within the viewport.
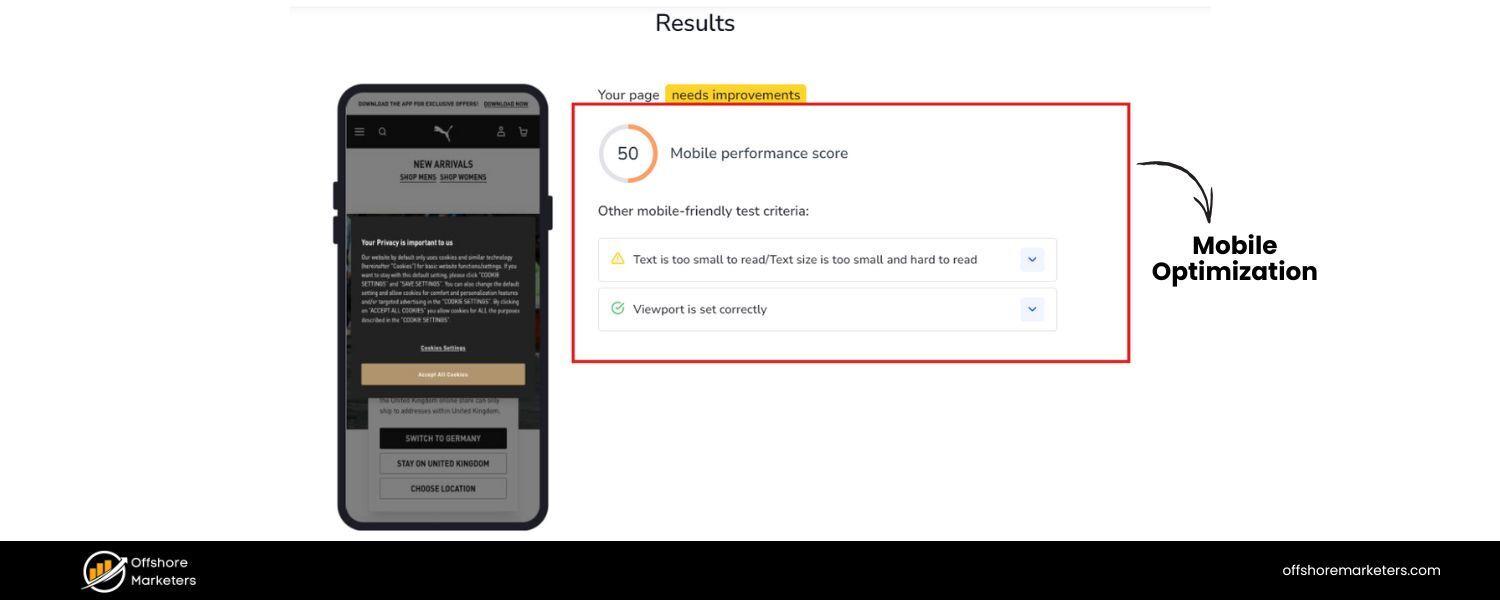
B. Mobile page speed:
Mobile users often have slower connections, making page speed (as discussed in the previous section) even more critical on mobile devices. Use Google’s Mobile-Friendly Test and PageSpeed Insights to gauge mobile performance specifically. Techniques such as image optimization, eliminating heavy scripts, and utilizing AMP (Accelerated Mobile Pages) for critical content can help improve performance._Google’s mobile-first indexing also means that if your mobile site loads very slowly, it could impact crawling and indexing._Optimize images for mobile devices, enable caching, and consider using adaptive serving (serving smaller images or fewer elements to mobile browsers).
C. Ensure content parity:
One key aspect of mobile-first indexing is content parity between your desktop and mobile sites. If you have a separate mobile site or if your responsive design hides content behind accordions or tabs on mobile, be aware that Google will still attempt to index all content it finds in the mobile version.
Historically, hidden content (such as in tabs) might have been devalued; however, Google has stated that content hidden for UX purposes (to save space on mobile devices) is typically acceptable and will be indexed.
The crucial part is: don’t cut out important content or structured data on your mobile pages. Whatever you want to rank for should be present in the mobile HTML.
For example, if your desktop page has a detailed product description but your mobile page only shows a summary, consider including the full description on mobile (perhaps under an expandable section).
Ensure headings, internal links, and metadata are consistent across all devices, including mobile.
D. Mobile usability factors:
Beyond content and speed, there are pure usability things that count as indirect SEO factors. These include not using intrusive interstitials (e.g., giant pop-ups that cover content on mobile are a big no-no for Google’s Page Experience), having functional navigation (hamburger menus that work smoothly), and ensuring forms or other interactive elements are easy to use on mobile.
In Google Search Console’s Mobile Usability report, you can see if there are specific issues such as clickable elements being too close, text being too small, or content being wider than the screen.
Fix any issues flagged there – they not only improve the user experience, but also ensure you’re meeting Google’s criteria for mobile friendliness.
E. Test on real devices:
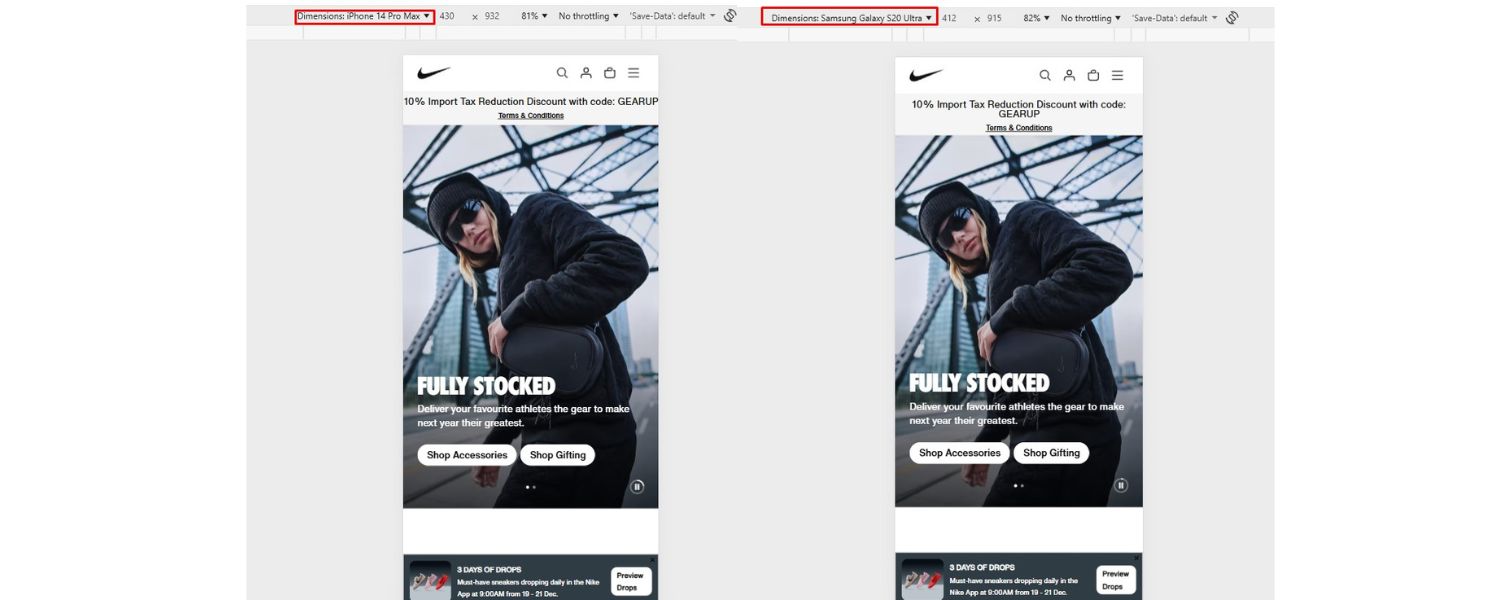
Don’t rely solely on emulators. Test your website on a variety of real mobile devices if possible (both Android and iOS, various screen sizes). Sometimes, things that appear fine in a Chrome emulator may behave differently on an actual phone.
Pay attention to load time, layout, and any functionality. If your site uses pop-ups or banners on mobile, ensure they are easy to close and don’t violate Google’s interstitial guidelines.
Google’s move to a mobile-first approach was a direct response to user behavior: more people now search on mobile devices than on desktops. Thus, Google wants to ensure the results it serves are mobile-friendly.
They even have a badge for “mobile-friendly” (although it’s no longer shown in results, the concept lives on in rankings).
By perfecting your mobile experience, you not only align with Google’s indexing priorities but also cater to the majority of users.
In essence, mobile optimization is a form of technical SEO. A site that’s fast, crawlable, and user-friendly on mobile is one that’s primed to rank well in 2025 and beyond.
Structured Data & Schema Markup: Speaking Search Engines’ Language
Wouldn’t it be great if you could give search engines a cheat sheet about your content? That’s essentially what structured data (Schema markup) does.
Structured data is a standardized format (usually JSON-LD code in your page’s ) that labels information on your pages, such as articles, products, reviews, recipes, events, and more, in a way that search engines can explicitly understand.
By adding schema markup, you help Google and other engines better interpret the content and context of your pages, which can unlock special search result features.
Implementing structured data offers two significant benefits:
1. It helps search engines better understand the content of your webpage.
2. It can make your pages eligible for rich results (also known as rich snippets) in the SERPs.
For example, with the proper schema, a recipe page could appear in search results with star ratings, cook time, and calorie information directly in the snippet.
An e-commerce product page typically displays the price, availability, and review stars.
These rich results can significantly improve your click-through rates because they’re more eye-catching and immediately applicable to users.
How to get started with structured data:
1. Identify which schema types are relevant:
Visit Schema.org or Google’s Search Gallery for structured data to see the vast array of content types that have schemas. Common ones include Article, BlogPosting, Organization, Product, Review, FAQ, HowTo, Event, Recipe, etc.
Focus on schemas that match your content. If you run a blog, the Article schema is a must. If you have products, the Product schema (with nested Offer and Review schema, if applicable) is incredibly useful. Adding an FAQ schema to an FAQ section of your page can make you eligible for the accordion-style FAQ rich result.
Look at your competitors or the search results for your target queries – are any of them displaying rich snippets, such as FAQs, how-tos, or other relevant content? If yes, implement that schema on your page.
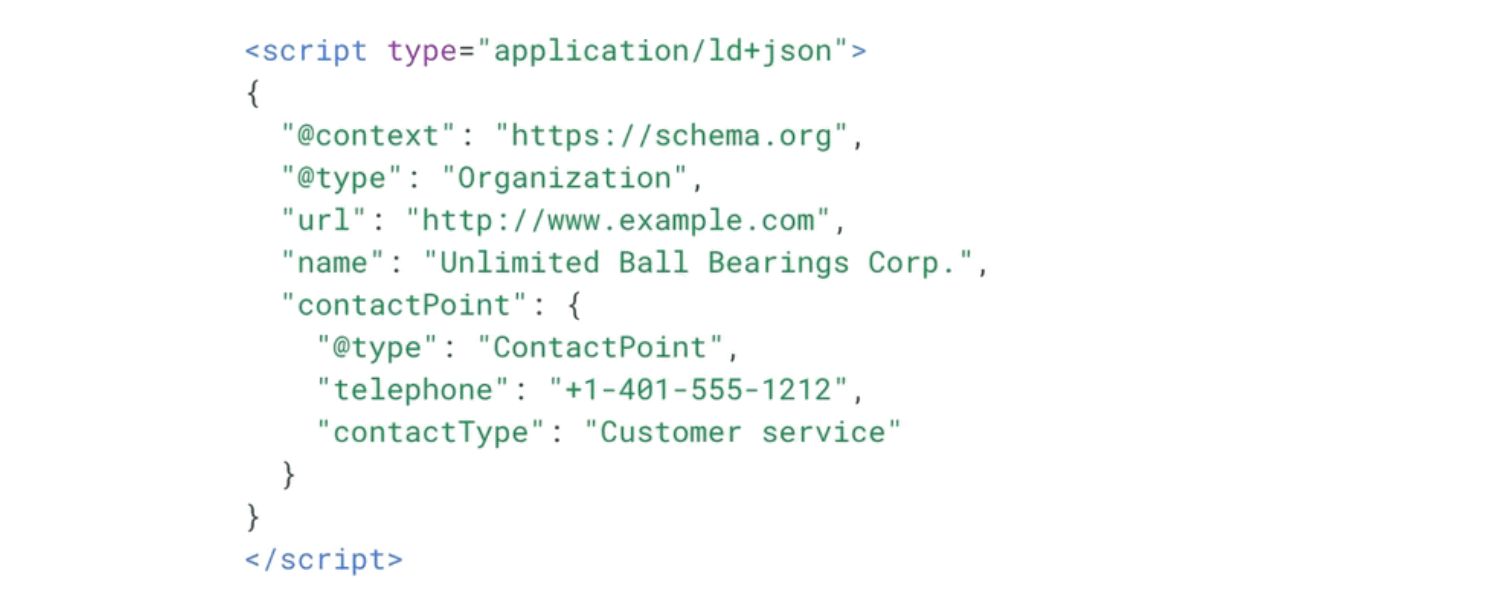
2. Use JSON-LD format:
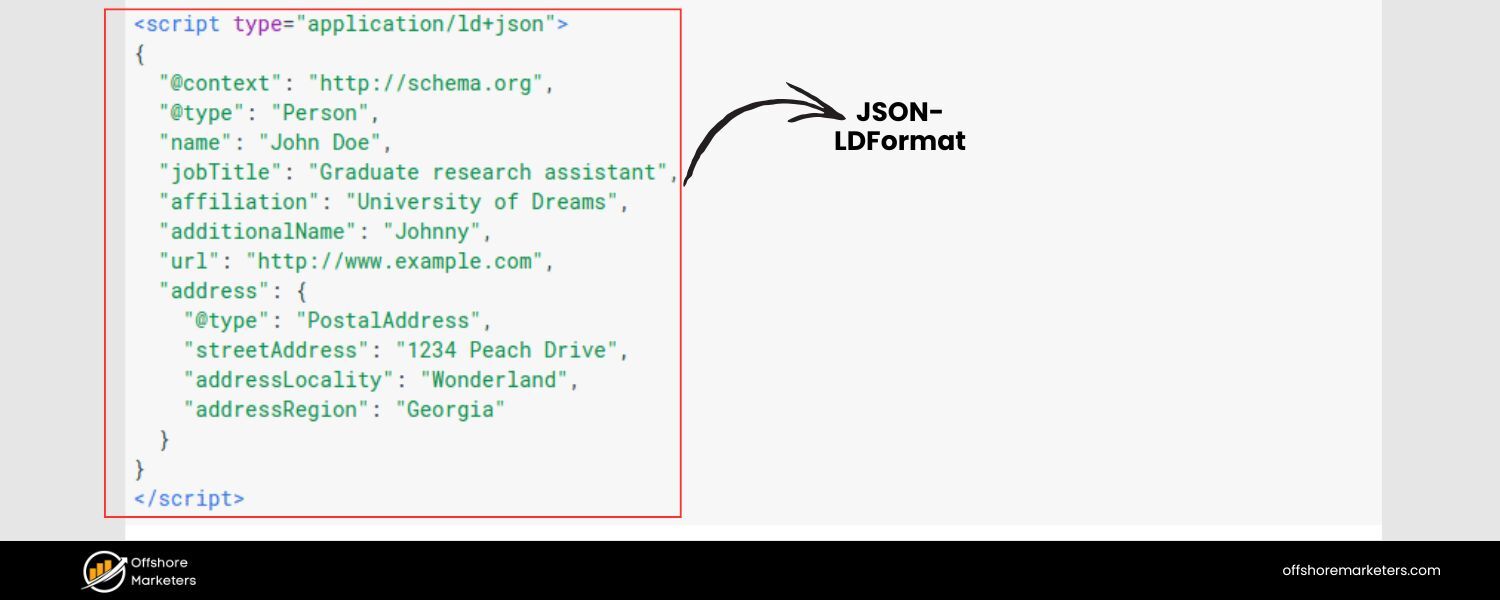
Google prefers JSON-LD (JavaScript Object Notation for Linked Data), which is a block of script that you put in the page’s head (or body) that doesn’t affect what users see but provides the structured info to crawlers.
It’s easier to manage and less intrusive than inline microdata. Many CMSs and plugins (like Yoast for WordPress) can automatically add basic schema for you (like page type or breadcrumbs).
For more complex schemas, you might need to manually craft the JSON-LD. Google’s structured data documentation provides examples; you can often copy those and adapt them with your page’s details.
3. Follow the guidelines and test:
It’s crucial to adhere to Google’s Structured Data Guidelines. For instance, if you mark up a Review schema, you shouldn’t put fake reviews or self-serving ratings. The content you mark up should be visible to users on the page (don’t hide data just for schema).
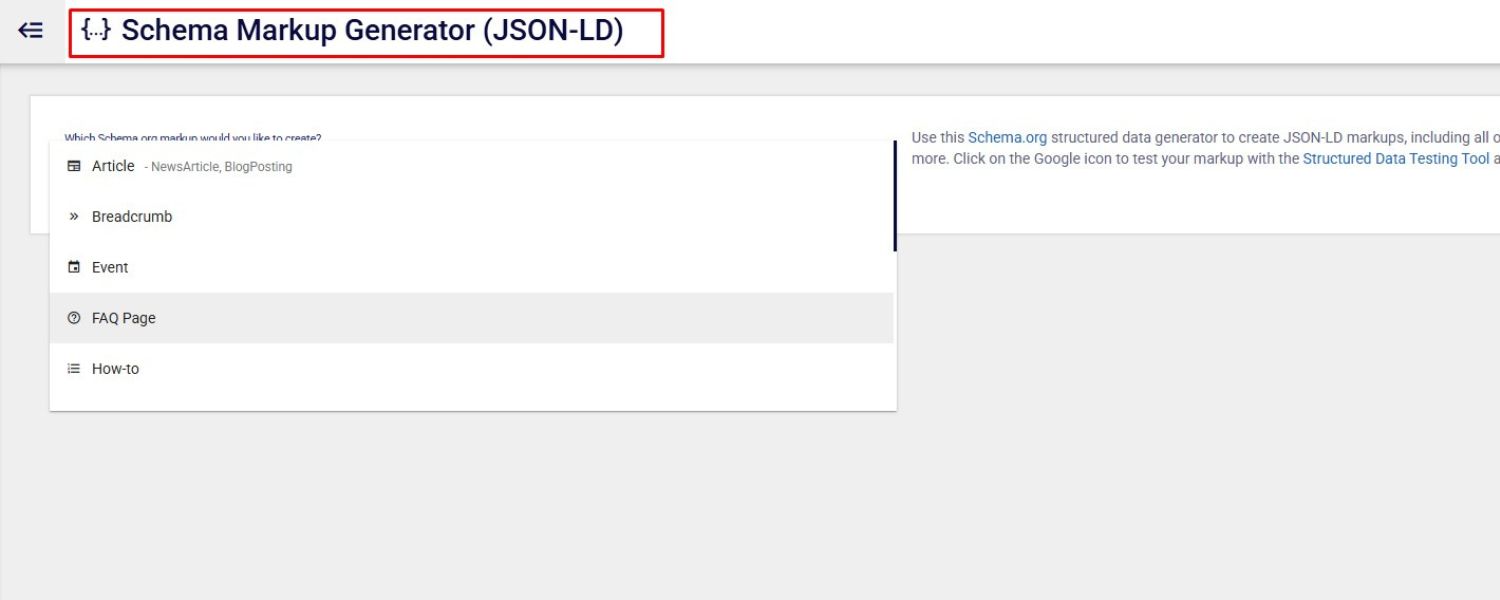
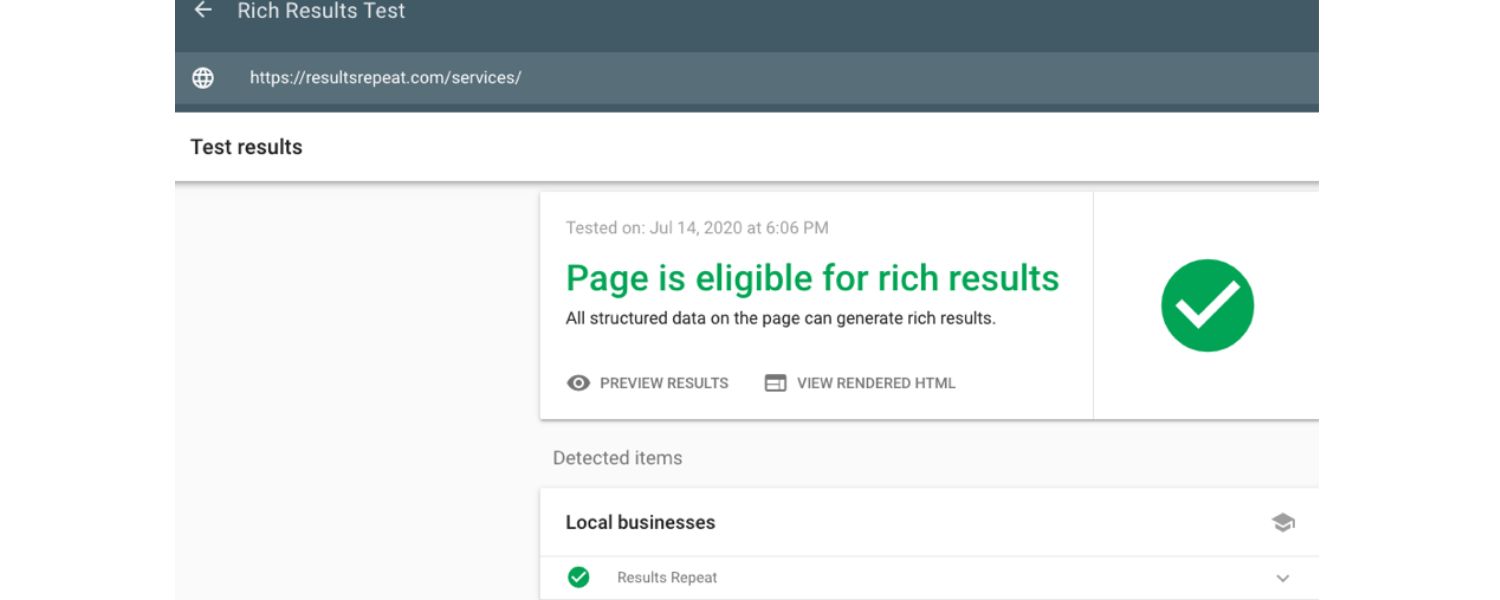
Once you add structured data, use the Rich Results Test tool or the Schema Markup Validator to check for errors. Google Search Console will also report schema errors or enhancements in the appropriate section (e.g., it will show if your Product markup has issues).
Fix any errors or warnings the tools highlight – an error can disqualify that page from getting a rich result.
4. Rich results and SEO impact:
 One thing to clarify – adding structured data by itself doesn’t directly boost your rankings (Google has said it’s not a direct ranking factor in most cases). However, the indirect benefits are strong.
By making you eligible for rich snippets, structured data can increase your CTR (resulting in more clicks from the same ranking, which in turn leads to more traffic).And if more users click your result and engage positively, that can send positive signals to Google.
Additionally, in some cases, having a specific schema (such as the Article schema with proper dates and authorship) may help Google properly feature your page in places like Top Stories or other SERP features.
In short, structured data can help you stand out and improve your search presence, a crucial aspect of modern technical SEO.
5. Keep up with updates:
Google occasionally updates which rich results it supports or the requirements. For example, in 2023, Google announced the end of support for FAQ rich results on most sites (only authoritative sites would continue to get them) – meaning even if you have FAQ schema, Google might not always show it.
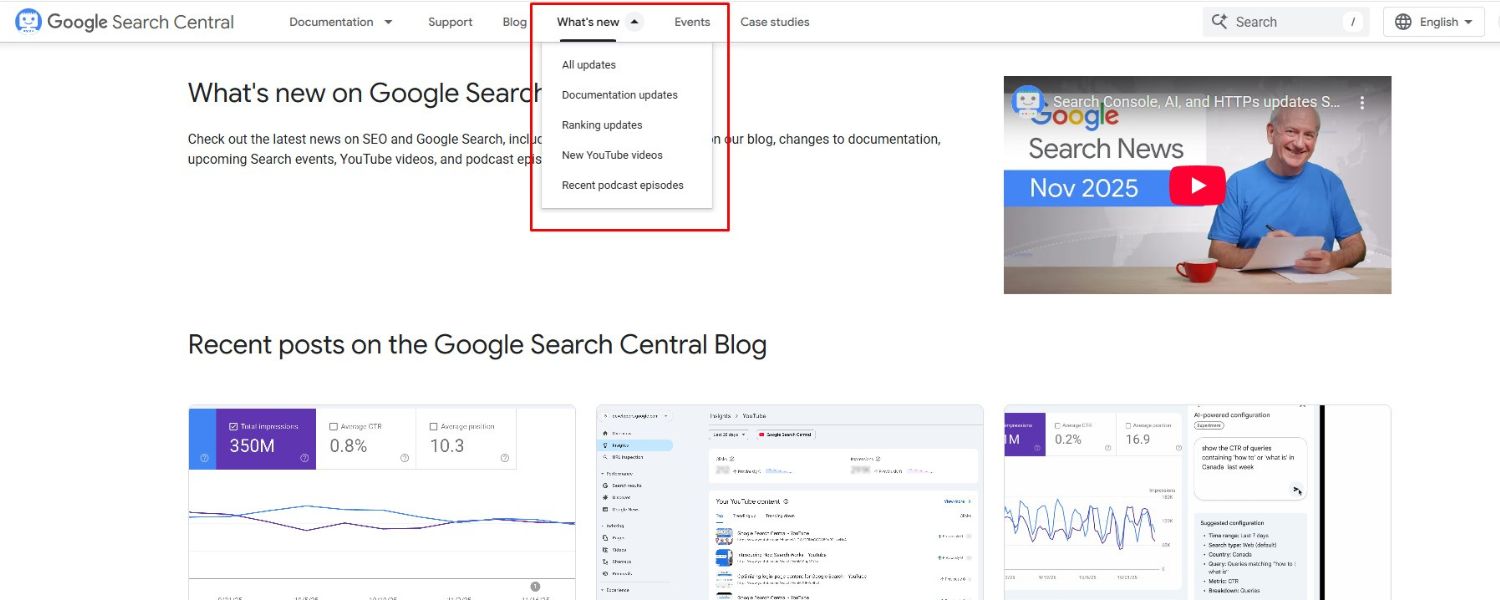
Stay tuned to the Google Search Central Blog for such updates. Additionally, if you implement a schema, ensure that you maintain it. Broken or out-of-date structured data (like a Product that goes out of stock but your schema still says “InStock”) could lead to misleading results.
It’s good practice to integrate schema generation into your CMS templates so that they update dynamically (e.g., if a price changes, the JSON-LD reflects that automatically).
By using structured data, you’re essentially speaking in Google’s native language about your content.
It’s a technical SEO enhancement that can give you a competitive edge, especially if your competitors haven’t adopted it yet.
When your result looks richer and more informative, users have a compelling reason to click it over others.
Adding appropriate schema markup is a relatively small effort that can yield significant gains in how your website performs in the SERPs.
HTTPS and Site Security: Secure Your Site for SEO
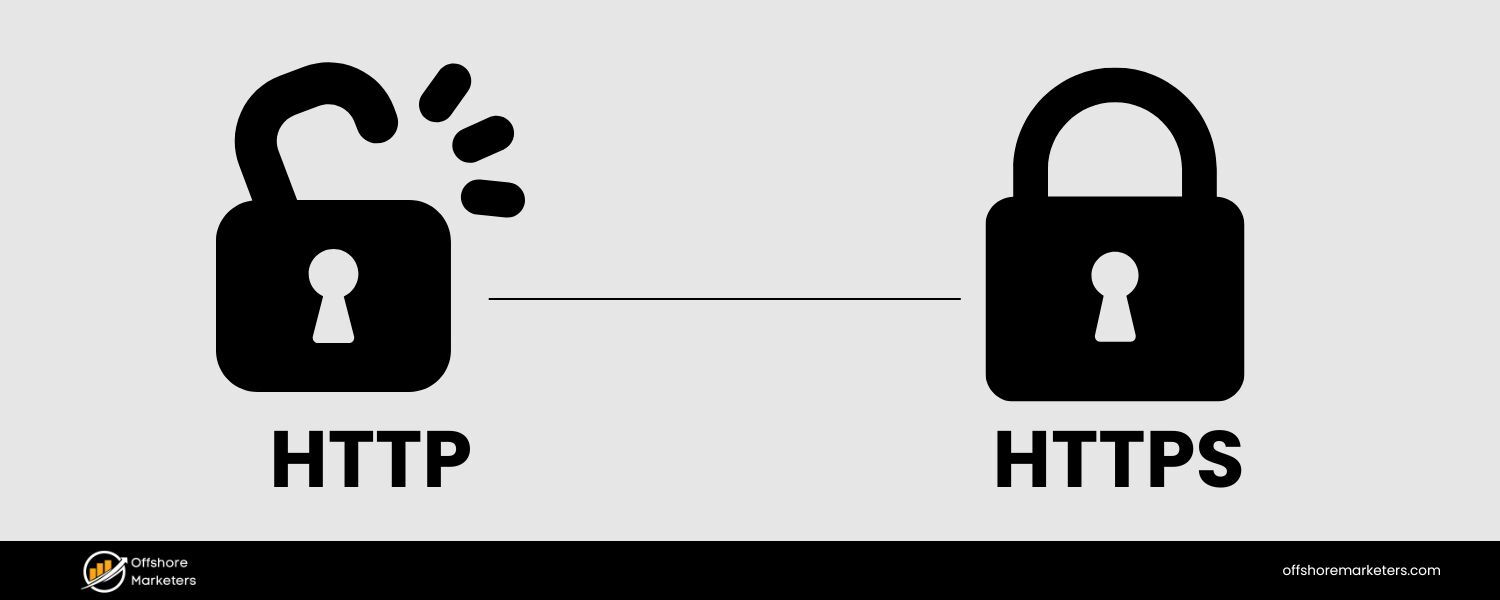
If your site still isn’t on HTTPS, it’s high time to make the switch. HTTPS (Hypertext Transfer Protocol Secure) is the encrypted, secure version of HTTP.
Several years ago, Google flat-out stated that HTTPS is a ranking signal, albeit a lightweight one. That was part of an initiative aimed at promoting a safer web.
Today, HTTPS is the expected norm – most browsers will mark non-HTTPS sites as “Not Secure,” which can deter users.
From an SEO perspective, while HTTPS by itself might not catapult you to #1, not having HTTPS could hurt trust and clicks, and it’s a tiebreaker in rankings when all else is equal.
Here’s what you need to know and do about HTTPS:
1. Get and install a TLS certificate:
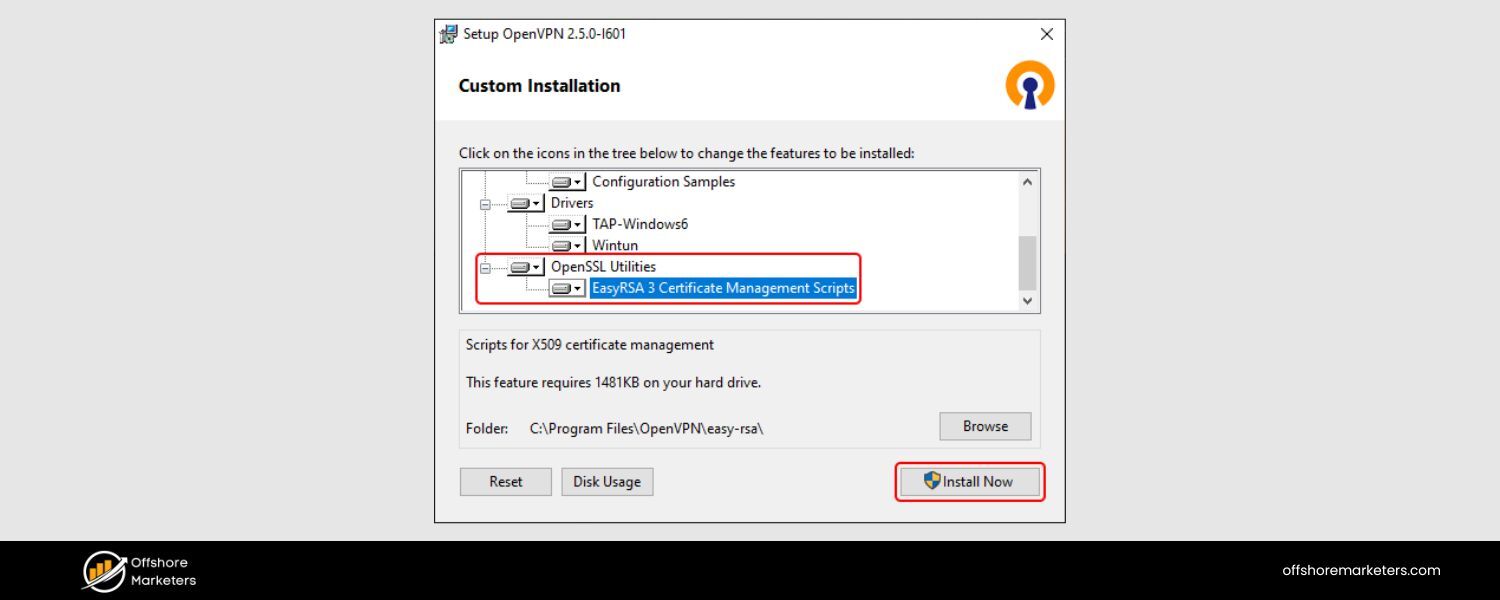
HTTPS works by using a TLS (formerly SSL) certificate issued for your domain. There are numerous options, including free certificates from Let’s Encrypt and paid ones from various providers.
Choose the type of certificate you need (single domain, multi-domain, or wildcard for subdomains). For most small sites, a single-domain or Let’s Encrypt certificate works fine. Configure it on your server so that your site is accessible via
https://.
2. Redirect HTTP to HTTPS:
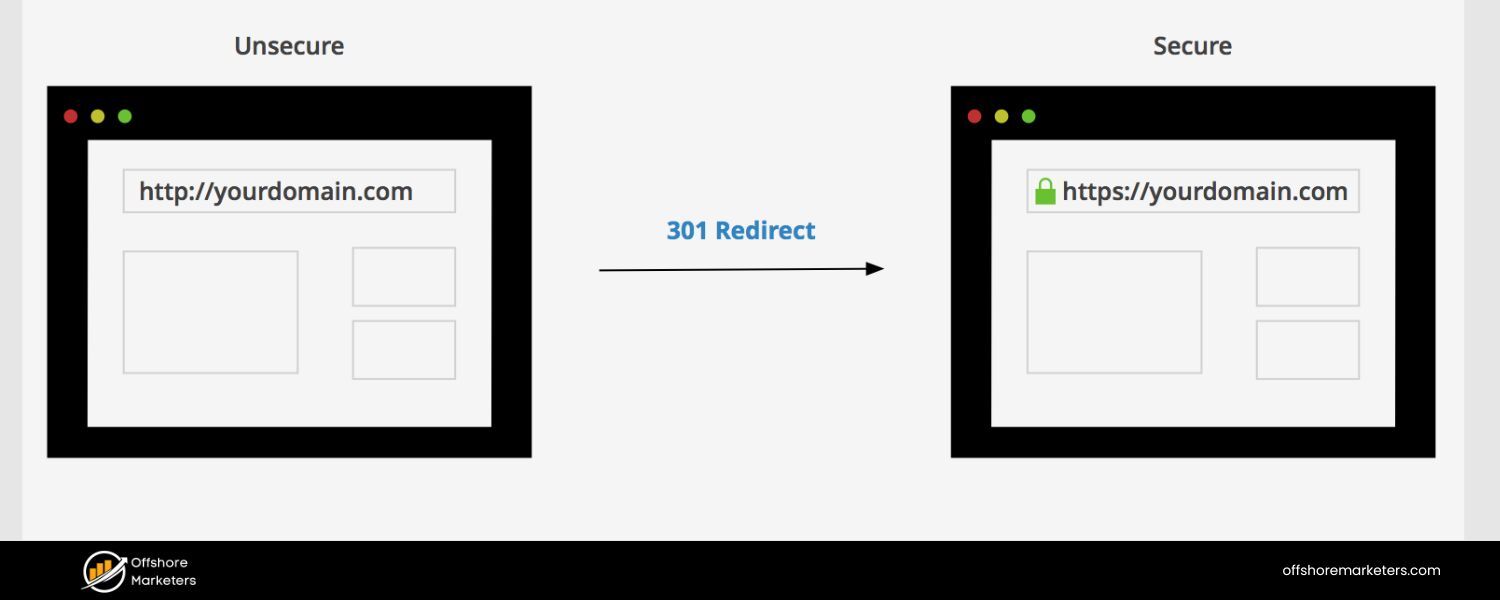
Once HTTPS is set up, implement 301 redirects from all http:// pages to their https:// counterparts. This ensures anyone following old links (or search engines crawling old HTTP URLs) will be redirected to the secure versions.
This also consolidates your link equity to the HTTPS URLs. Typically, you’d set a rule at the server or CDN level to globally redirect to HTTPS. After that, update any hard-coded internal links or references to use https (though a global redirect catches them, it’s cleaner to update the source).
In Google Search Console, add the HTTPS version of your site as a property (if you haven’t already) and make that your primary focus.
3. Avoid mixed content:
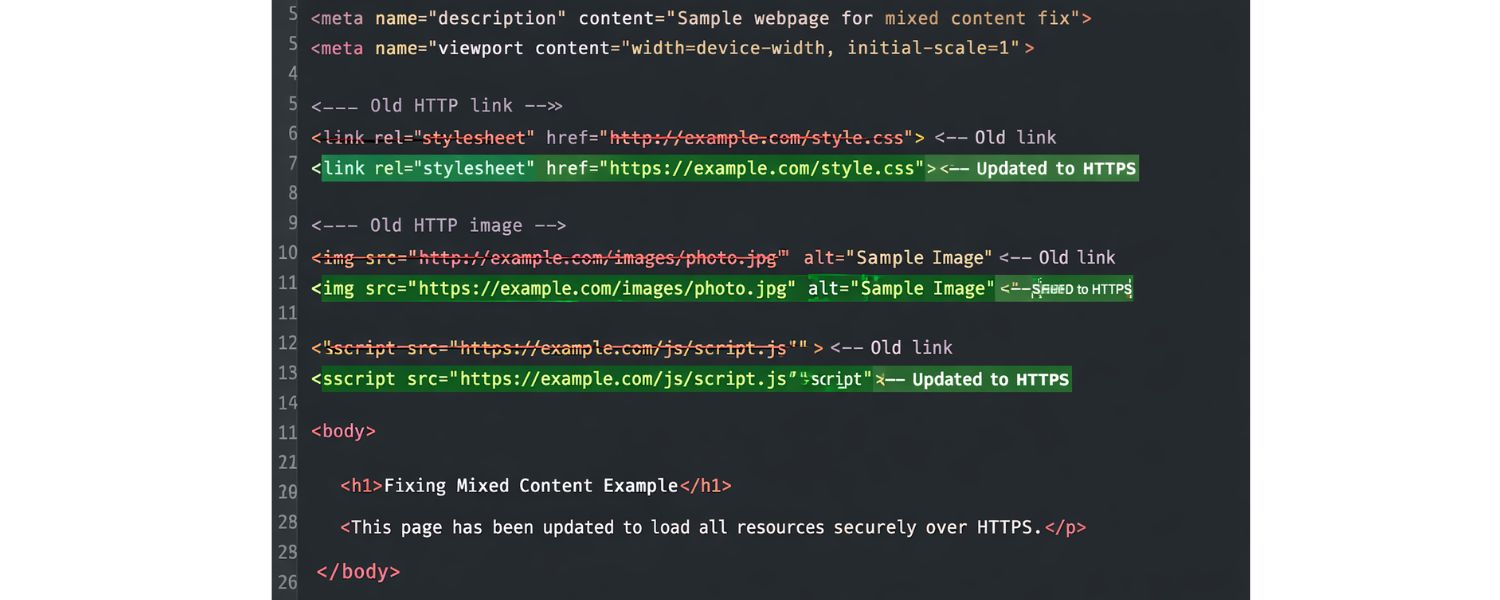
A common issue during HTTPS migration is mixed content, which occurs when a page is loaded over HTTPS but includes some resources (such as images and scripts) that are loaded over HTTP. Browsers will often block those non-secure resources, which could break functionality or images on your page.
Use your browser’s developer console to identify any mixed content warnings and update those URLs to HTTPS. Most external resources nowadays offer HTTPS versions – if not, you may need to find alternatives or host them yourself.
4. Security beyond HTTPS:
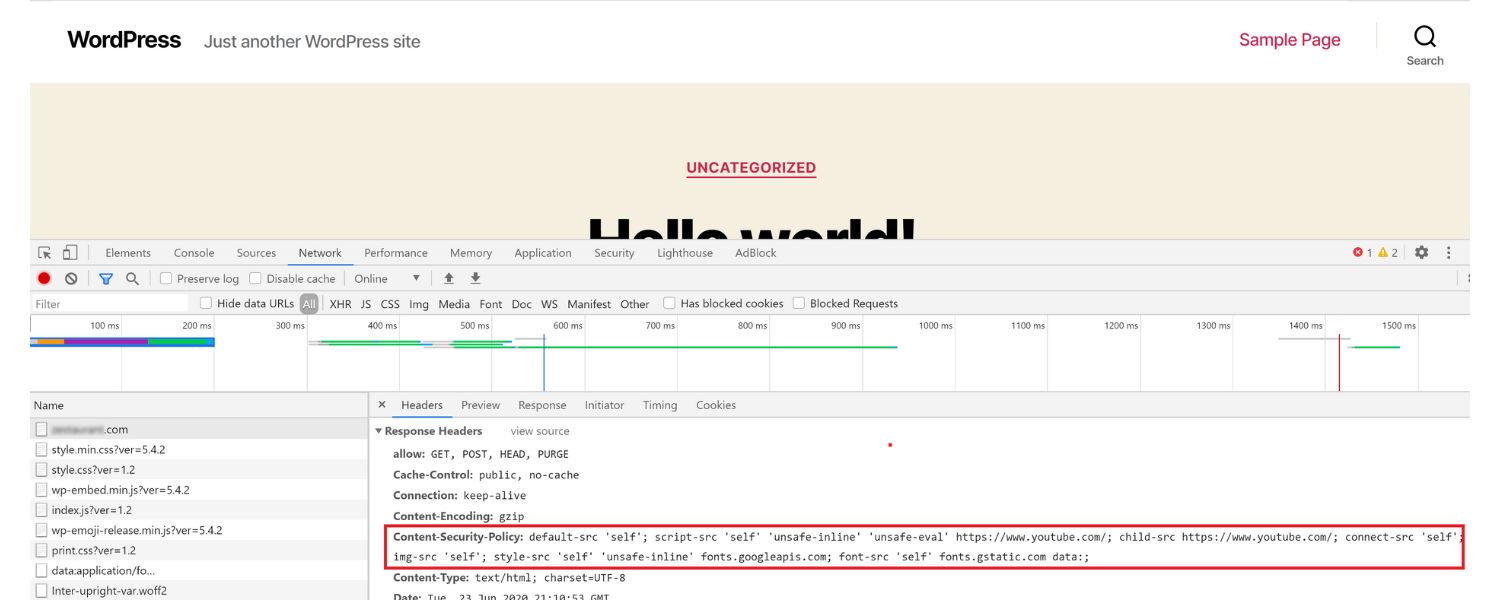
While HTTPS is the baseline, also consider other security measures that indirectly improve SEO. For example, implementing a Content Security Policy (CSP) or HTTP Strict Transport Security (HSTS) header can further bolster your site’s security.
These don’t directly impact rankings, but they ensure a secure experience for users. HSTS in particular tells browsers to always use HTTPS for your domain, which can slightly improve efficiency (and avoid any accidental HTTP loads).
5. Trust and E-A-T:
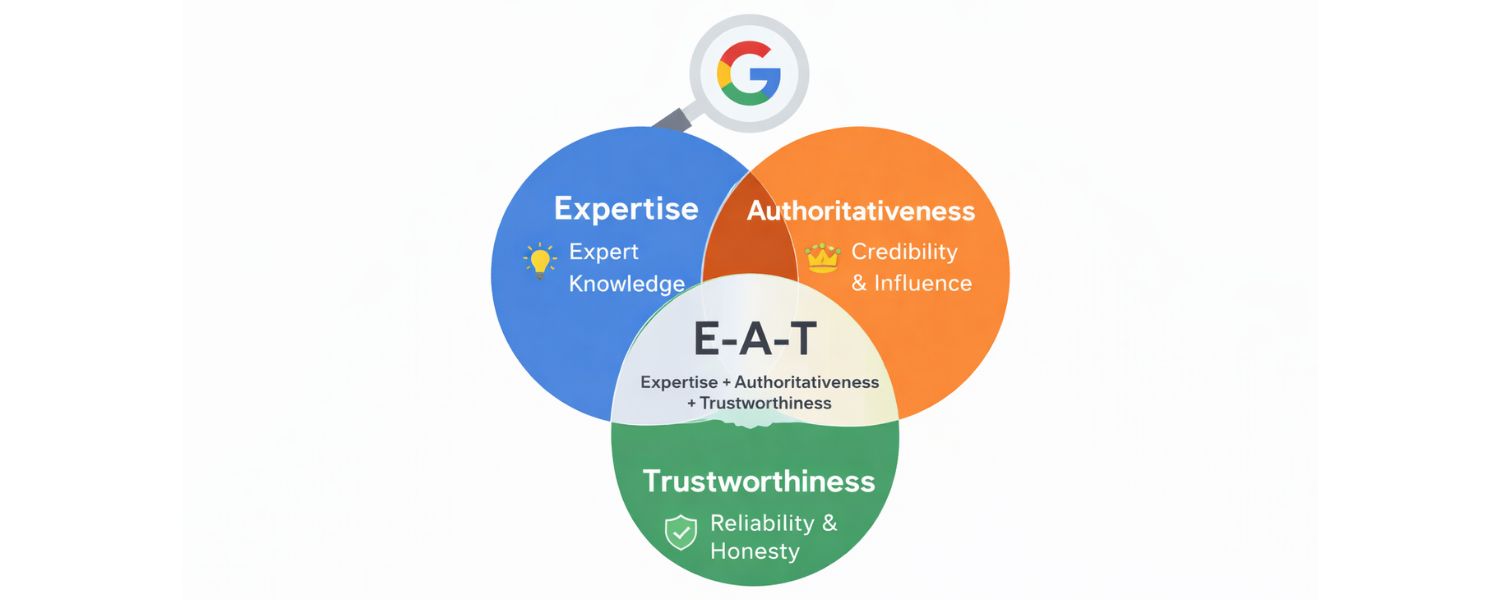
A secure site contributes to user trust. In the context of Google’s E-A-T (Expertise, Authoritativeness, Trustworthiness) principles, having a secure site is part of “Trustworthiness.”
If you were Google, would you want to rank a page that might be interceptable by attackers or one that’s secure for users? The latter. Moreover, for e-commerce or any site handling personal data, HTTPS is mandatory – users won’t want to enter credit card info on a non-secure page. So, beyond the ranking signal, it’s just good business and user sense to use HTTPS.
The bottom line: Switching to HTTPS is one of the more straightforward technical SEO wins. Google has even hinted they might strengthen the weight of HTTPS in the algorithm over time (initially it affected <1% of queries, but now most first-page results are HTTPS).
If your competitors are all HTTPS and you’re not, you’re at a disadvantage. Conversely, if some competitors in your niche are oddly still not secure, going HTTPS could give you a slight edge (and at least you won’t turn away privacy-conscious visitors).
Once implemented, HTTPS essentially becomes a set-and-forget process (with perhaps an annual certificate renewal, unless you automate this process). It’s a one-time technical upgrade that yields lasting benefits for SEO and user trust.
Fixing Broken Links & Redirects: Cleaning Up Site Errors
A polished technical SEO profile involves cleaning up the “loose ends” on your website, specifically addressing broken links, broken pages, and redirect issues.
These are the kind of technical details that, if neglected, can undermine your site’s user experience and search performance.
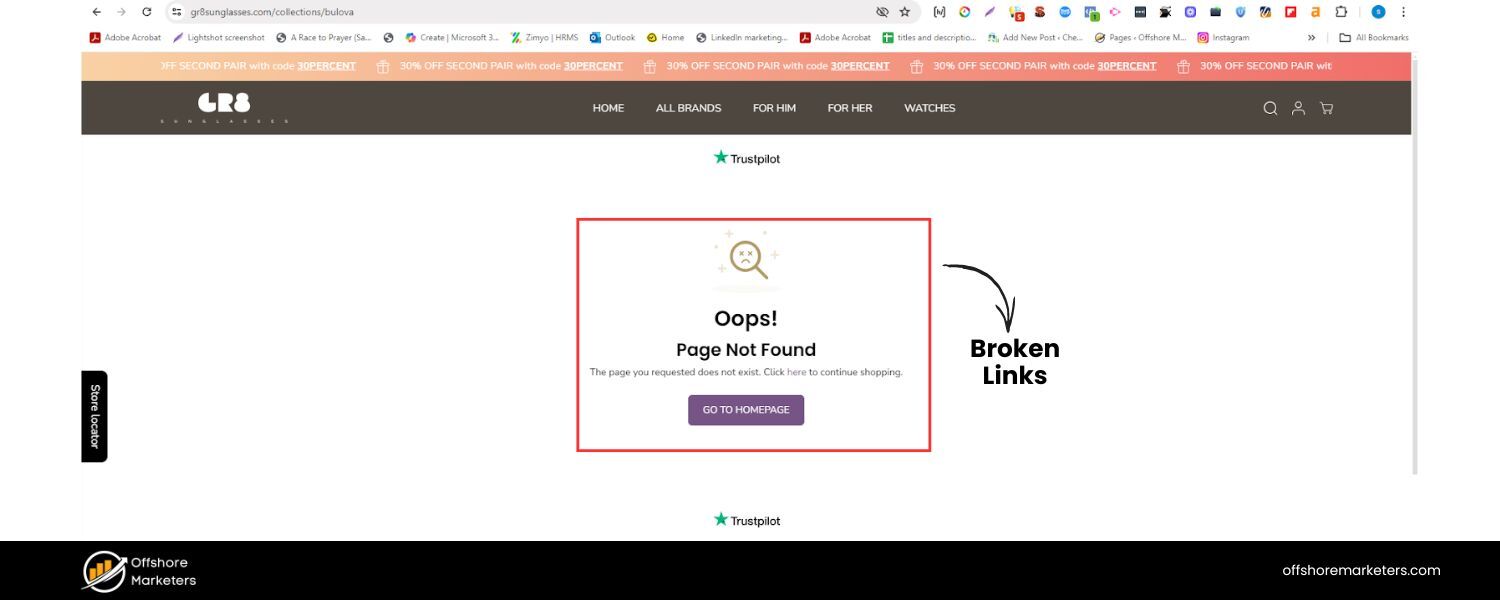
Broken links (404 errors) occur when a page that was once accessible at a specific URL is no longer available (and not redirected). Users who click such links encounter a dead end, and search engines interpret this as a negative signal for quality.
Too many 404 errors can also waste crawl budget, as Googlebot attempts to fetch pages that don’t exist. It’s normal for any site to accumulate some broken links over time (perhaps you deleted old content or changed URLs), but part of technical SEO maintenance is addressing them.
How to handle broken links and other errors:
1. Regularly crawl your site for 404s:
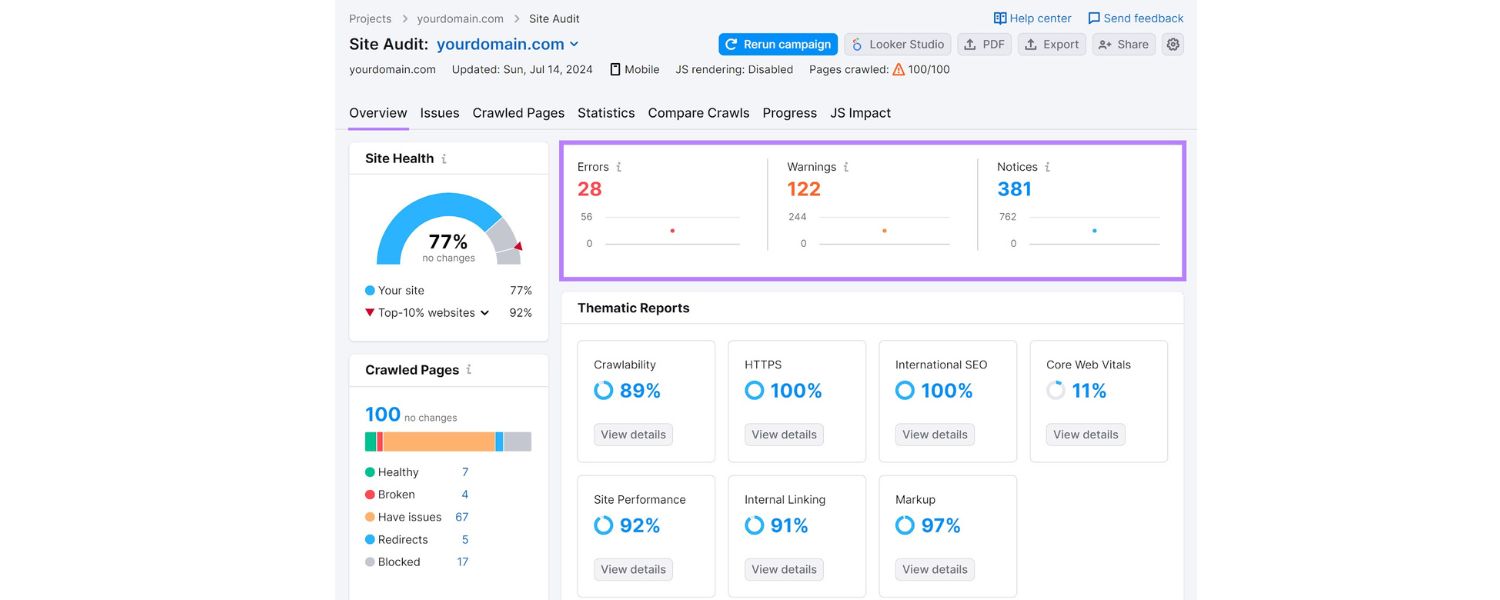
Use a tool like Screaming Frog or Sitebulb, or even online services, to crawl your website and find broken links. These tools will list any internal links that lead to a 404 page. Also, check Google Search Console’s Coverage report – it will list “Not Found (404)” pages that Google encountered.
Once you identify broken URLs, figure out where they’re linked from. Update those links to point to the correct page, if one exists. If the content is no longer available, remove the link or replace it with a link to a similar, relevant page.
2. Set up proper redirects:
For any critical page that moved to a new URL, you should implement a 301 redirect from the old URL to the new URL. A 301 indicates a permanent move and passes the majority of the ranking signals to the new page. This is critical if you restructure your site or rename URLs.
For example, if /old-page is now /new-page, add a redirect so that anyone or any bot visiting/old-page is automatically sent to /new-page.
Users won’t see a broken page, and Google will eventually index the new URL while carrying over the SEO value from the old one. Keep a redirect map during site migrations to ensure nothing is left out.
3. Avoid redirect chains and loops:
A redirect chain occurs when a user navigates from Page A to Page B, then to Page C (multiple hops). These can slow down crawling and dilute signals. Wherever possible, tidy up redirects so that A goes straight to C if that’s the end target.
A redirect loop is worse (A -> B -> A …), which will trap crawlers in an infinite loop, and nothing gets loaded – always test your redirects to make sure they resolve properly.
Tools or GSC can also flag redirect chain issues. Keeping redirects direct and minimal helps preserve site speed and crawl efficiency.
4. Custom 404 page:
Even with vigilance, some users may still encounter a 404 error. Create a user-friendly 404 page that offers helpful navigation, such as links to popular sections, a search bar, or an apology and suggestion to visit the homepage.
This keeps users engaged with your site, rather than causing them to bounce away. While this doesn’t directly boost SEO, it improves user experience, which is indirectly beneficial for SEO. Additionally, a custom 404 page can be branded, providing an opportunity to showcase personality or offer useful links.
5. Monitor server errors (5xx):
Besides 404s, watch out for server errors, such as 500 Internal Server Error, 502 Bad Gateway, etc. These could indicate server configuration issues or pages that are timing out due to heavy scripts or database issues. Server errors mean Google can’t access your content at that time, which can hurt indexing.
If Googlebot encounters too many 5xx errors, it might slow down crawling, thinking your server is struggling. Use uptime monitoring tools to alert you to outages, and utilize Search Console to identify any persistent errors being reported.
Resolve them by debugging server issues or collaborating with your hosting provider.
Cleaning up broken links and managing redirects might seem like unglamorous grunt work, but it’s fundamental to technical SEO hygiene. Users hate dead links, and search engines see them as a sign of neglect.
By regularly checking for these errors, you ensure that link equity flows properly through your site and that both users and crawlers have a seamless experience.
It’s like maintaining the roads in a city – fixing potholes (404s) and ensuring detour signs (redirects) point in the right direction, so traffic keeps flowing at optimal speed.
International & Multilingual SEO: Hreflang and Regional Targeting
(This section applies if you have a website that serves different languages or countries. If not, you can skip it – but it’s good to know for future growth.)
If your site has content for multiple languages or regions, hreflang tags are a technical SEO element you’ll want to implement.
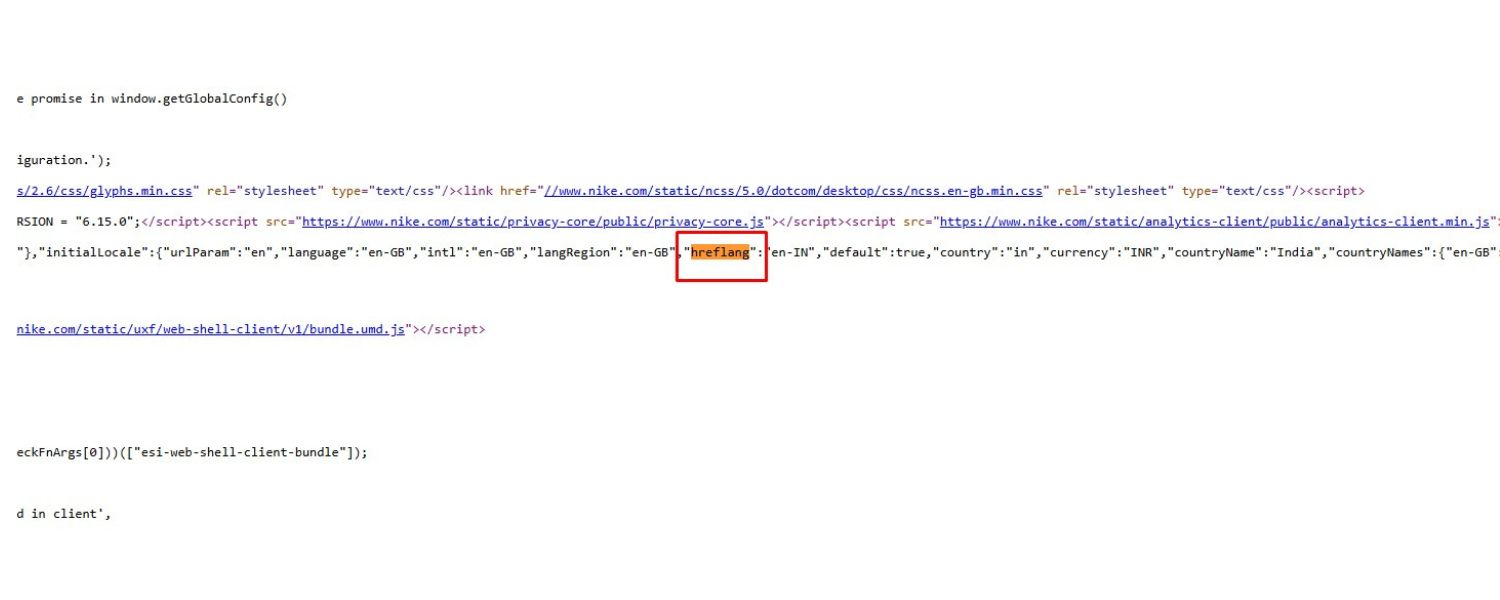
The hreflang attribute tells Google and other search engines which language or country variant of a page to show to users in different locales.
For instance, if you have an English page and a Spanish version, you’d use hreflang tags to indicate which is which.
This prevents Google from seeing them as duplicate content and ensures (ideally) that a Spanish searcher sees the Spanish page, not the English one.
Key considerations for international SEO:
1. Use hreflang for language/region variants: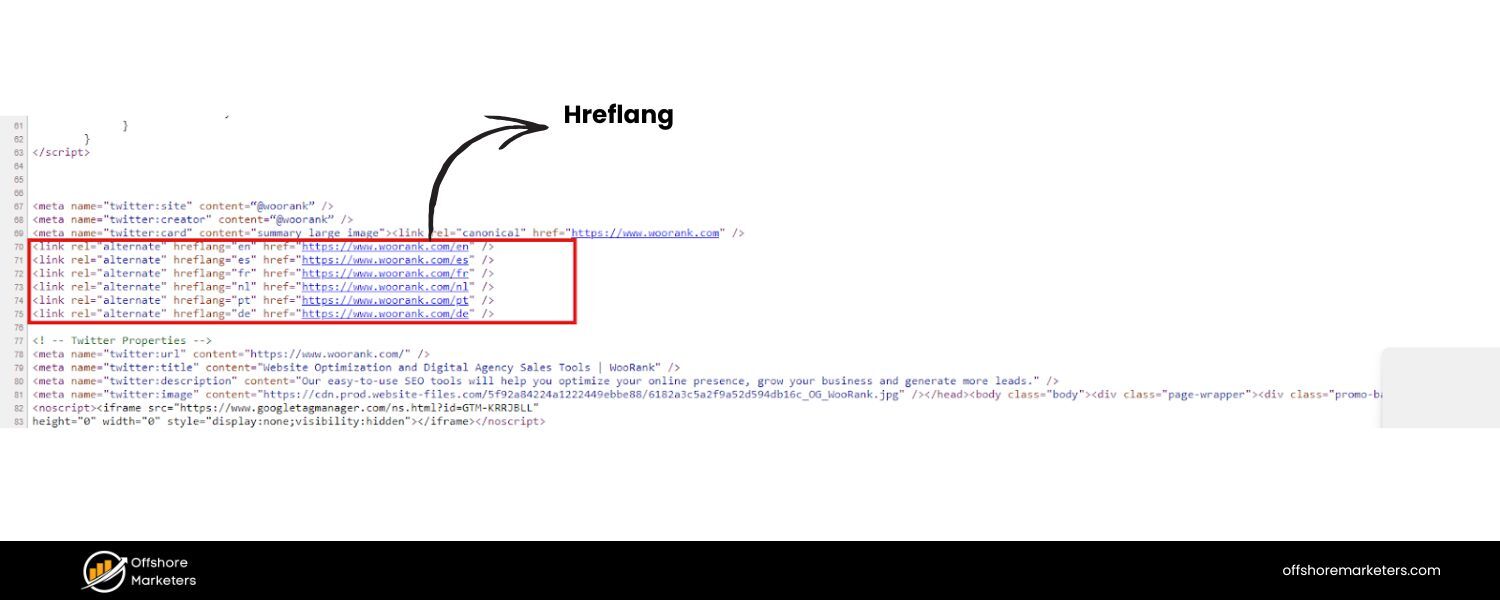
Hreflang is added in the HTML section, via HTTP headers, or in sitemaps. A typical hreflang tag looks like: Each page should list itself and its variants. So your English page’s head would have tags for “en” and “es” (and any other languages), and vice versa.
Be sure to include a self-referential hreflang as well (each page lists itself with its own language). Also, use region codes if needed (like hreflang=“en-GB” for English UK vs en-US for US). Correct implementation ensures that users see the right content for their locale, thereby avoiding potential duplicate content problems between language versions.
2. Consider a default using hreflang “x-default”:
If you have a generic page that isn’t specific to a single language or you want to specify a fallback, you can use hreflang=“x-default”.This is often used on homepages that auto-redirect or auto-select language, or a language selector page. It tells Google that this page is the default that should be shown if none of the other hreflang tags match the user’s language.
3. Geo-targeting in Search Console:
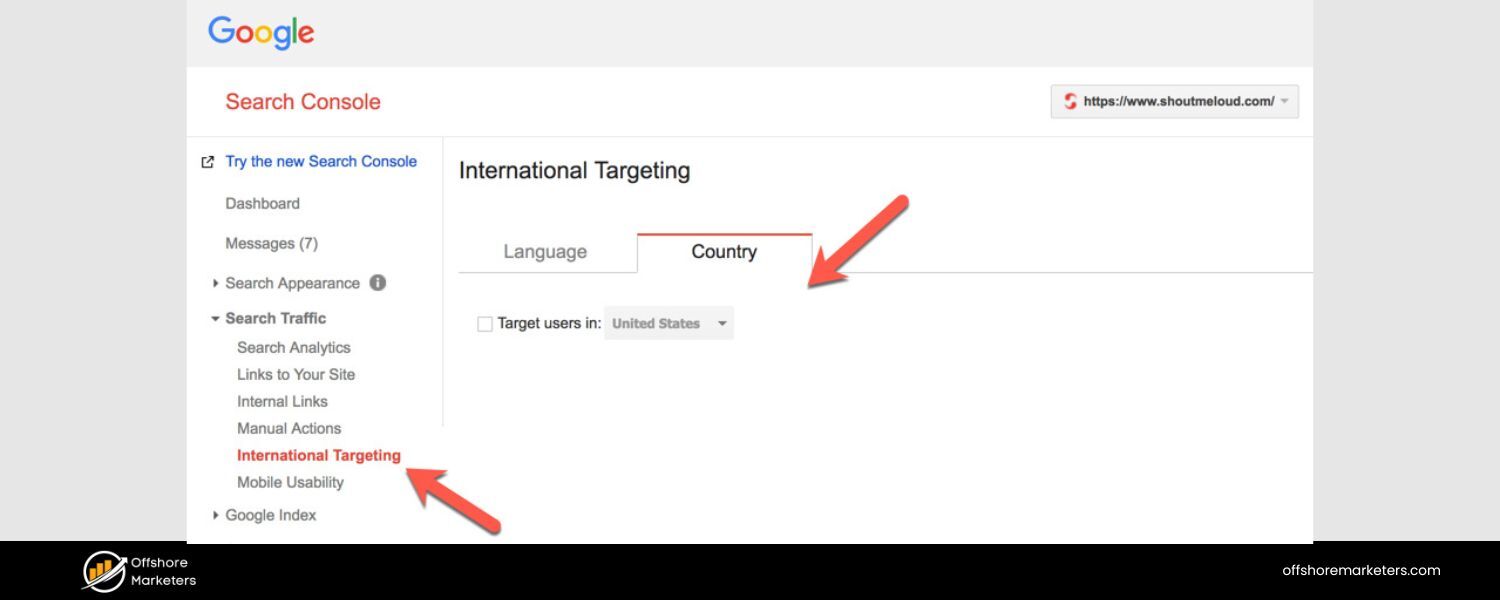
For country-targeted sites (not language per se, but a specific country), you can set a target country in Google Search Console (under Legacy Tools -> International Targeting). However, use this only if your site truly is meant for one country; if you are global or multi-regional, it’s best to leave it unset and rely on hreflang and ccTLD or subfolder structure.
4. URL structures for international sites:
 The technical SEO of internationalization also involves structuring your URLs effectively. Typical approaches include using country-code top-level domains (ccTLDs), such as .fr for France, subdomains (e.g., fr.example.com), or subdirectories (e.g., example.com/fr/).
Each has its pros and cons… ccTLDs strongly signal a country but require separate domain management. Subdirectories are easy to manage under one domain, but rely on hreflang and maybe GSC settings to signal country targeting.
Regardless of the option you choose, ensure consistency and that your site’s navigation allows users to switch languages easily.
5. Content translation and duplication:

Simply duplicating English content into another language (via automated translation) can be risky – automatic, poor-quality translations might be seen as spammy. It’s best to have professionally translated content for each locale. From a technical standpoint, avoid mixing languages on one page; each page should primarily target one language.
6. Avoid IP or automatic redirects based on location:
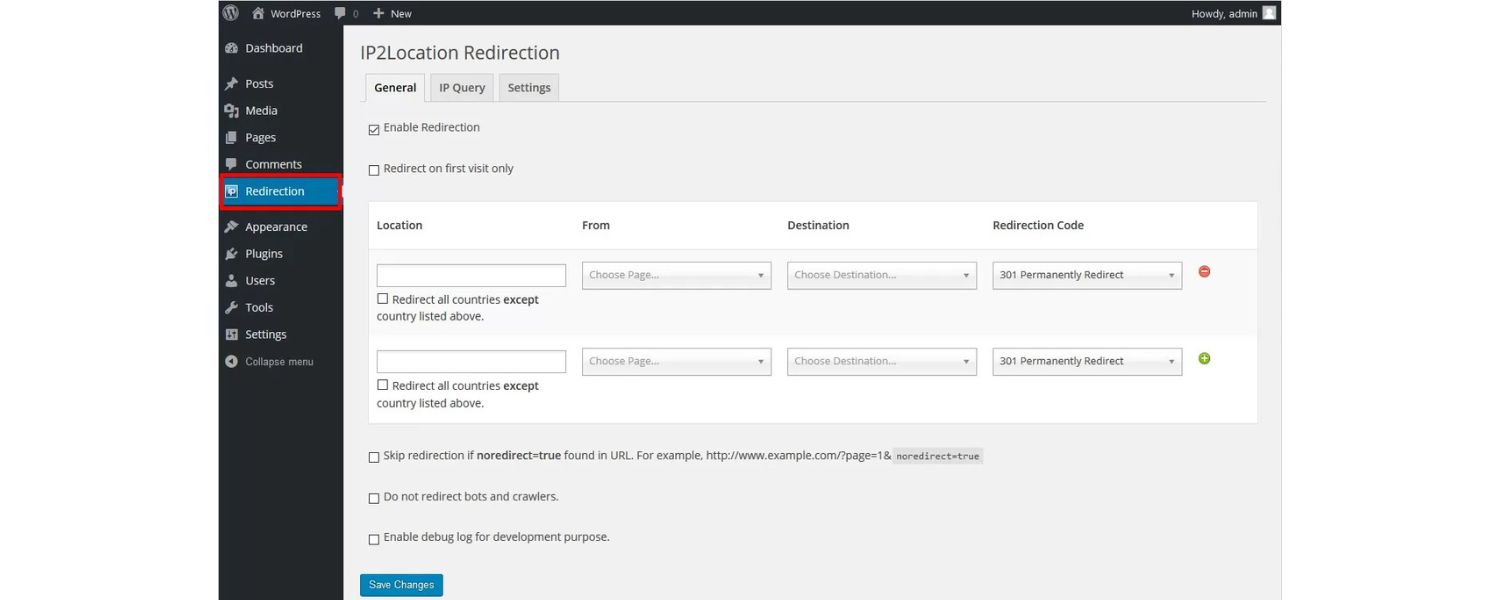
Some sites attempt to auto-redirect users to their country-specific site based on IP detection. This can cause SEO issues because Googlebot (primarily originating from US IPs) may not easily access your other language pages if the site consistently redirects them to the US version.
If you do use auto-redirects, ensure that there’s still a way (such as a link) for Google to discover the other versions. Alternatively, use hreflang without auto-redirects and let users manually switch if needed.
International SEO can be complex, but hreflang is the primary technical component that needs to be right. When done correctly, it improves the user experience for global audiences and ensures you’re not competing against yourself in search rankings across languages.
For example, your French page can rank in Google France while your English page ranks in Google US, each serving their audience best. This can significantly expand your reach and traffic if you operate in multiple markets.
Ongoing Technical SEO Audits & Best Practices

Technical SEO isn’t a one-and-done task – it’s an ongoing process of maintenance and improvement. Websites are living systems: you’ll add content, remove pages, redesign layouts, install new plugins or scripts, and each change could introduce new technical issues or opportunities. That’s why regular technical SEO audits are essential to keep your site in tip-top shape.
Here’s how to stay on top of technical SEO in the long run:
1. Schedule periodic audits:
Depending on your site’s size and how frequently it changes, schedule a full technical audit, perhaps every quarter (for smaller sites) or every month (for larger, constantly changing sites).
During an audit, use crawling tools to identify new broken links, verify site speed reports, ensure robots.txt and sitemaps are up to date, and other relevant tasks. Many SEO professionals utilize checklists for audits, covering a wide range of topics, including response codes, duplicate content, and mobile usability.
The goal is to identify issues early, before they impact your rankings. For instance, if a developer accidentally noindexed a section of the site, an audit would catch that before it drastically impacted traffic.
2. Monitor Search Console and analytics:
Google Search Console is your direct line to Google’s view of your site. Monitor it for any Coverage issues (errors and warnings), Enhancements (like schema issues), Mobile Usability alerts, or Security issues (if Google detects hacking or malware).
GSC will also notify you of significant drops in indexed pages or spikes in errors. Likewise, keep an eye on Google Analytics (or your preferred analytics tool) for unusual drops in organic traffic, which may indicate technical issues (e.g., a section of the site has been accidentally deindexed or a botched site update is causing pages to drop). Early detection can save you from significant ranking losses.
3. Keep software and plugins updated:
Outdated CMSs or plugins can cause performance issues or security vulnerabilities. For example, an old plugin might slow down your site or output non-optimized code. Always update to the latest stable versions (after testing if possible).
Not only does this help with security (a hacked site is disastrous for SEO, as it can lead to being blacklisted), but newer versions are often more efficient.
Also, occasionally review your plugin list – if there are some you aren’t using, remove them to reduce bloat. Ensure that any new feature or plugin you add is configured in an SEO-friendly manner (for instance, if you add an events calendar, ensure the event pages aren’t blocked from indexing unless you intend them to be).
4. Stay informed on SEO changes:
The SEO landscape changes frequently. Google releases updates and new recommendations (for example, the introduction of Core Web Vitals as a ranking factor, or changes in how it treats certain tags or schemas). Follow reliable SEO news sources (Google’s Search Central Blog, Search Engine Land, Moz, etc.) to learn about these changes.
For instance, if Google announces that Interaction to Next Paint (INP) is replacing First Input Delay as a Core Web Vital, you’d know to adjust your performance monitoring accordingly.
By staying informed, you can proactively adapt your technical SEO strategy to align with the latest best practices.
5. Utilize tools for continuous monitoring:
There are many SEO tools (both free and paid) that can help automate some of this ongoing vigilance. For example, some services will alert you if your site goes down or if there’s a spike in 404 errors. Others can do nightly crawls and email you a report of issues.
Google Analytics Intelligence can even send alerts for unusual traffic drops. Using these tools can act as an early warning system.
Technical SEO maintenance might sound tedious, but it’s like the routine maintenance of a car. Without oil changes and check-ups, even a Ferrari can break down. Similarly, your high-performing website can lose its shine if technical glitches accumulate.
By regularly auditing and monitoring, you ensure minor issues don’t snowball into big problems. The payoff is sustained SEO performance and the ability to adapt quickly when search engines evolve.
Conclusion: Implementing Technical SEO for Long-Term Success
Technical SEO might seem complex, but it boils down to a simple principle: make your site as easy as possible for both users and search engines to access, understand, and trust.
By following the strategies in this guide – from crafting a clean site structure and ensuring thorough crawling and indexing, to speeding up your pages, securing your site, and beyond – you are building a rock-solid foundation for all your other SEO efforts.
Remember, content and backlinks (the other two pillars of SEO) can only drive results if your technical foundation is strong. Think of great content as a fancy sports car and links as the fuel; technical SEO is the engine and road – without it, the car isn’t going anywhere.
When you handle technical issues, you allow your content to shine and your authority signals to count fully.
The benefits of technical SEO are often “invisible” when done right – users might not consciously notice that your site loads blazingly fast or that they never encounter dead links.
They’ll have a smooth experience, which increases their satisfaction and likelihood of returning or converting. Search engines, in turn, will reward that positive experience with better rankings over time, since your site meets their quality criteria.
Now that you’re equipped with this comprehensive technical SEO checklist, it’s time to take action:
1. Audit your website (using the sections of this guide as a checklist) to identify areas of improvement. You might be surprised by what you discover! Prioritize fixes based on impact – for example, if your site isn’t yet HTTPS or has serious mobile usability issues, tackle those first. If things are mostly in good shape, focus on enhancements such as implementing structured data or further improving page speed.
2. Monitor the results of your technical optimizations. Often, you’ll see improvements in crawling (more pages indexed), maybe a boost in rankings for pages that were previously held back by issues, and better user engagement metrics.
Continue learning and staying updated, as technical SEO is an ever-evolving field. The fundamentals we covered will likely remain relevant for years, but new technologies (such as how Google handles JavaScript or emerging SEO tools) will continue to emerge.
Finally, be patient and persistent. Some technical SEO fixes can yield quick wins (e.g., fixing an indexing issue can bring a page back to Google’s index within days), while others are more about long-term gains (improving Core Web Vitals might steadily boost your rankings and user retention over months). But every improvement counts toward building a site that search engines love.
Call to Action: Ready to elevate your site’s performance? Start implementing these technical SEO best practices today.
Run a crawl, fix those errors, optimize your speed, and watch as both Google and your users take notice.
Technical SEO is an ongoing journey, but every step you take will drive your website further up the search rankings. Good luck, and happy optimizing!

Why Roseville Startups are Choosing Offshore Marketers to Scale Smarter
Roseville is no longer just a quiet suburb of Sacramento;...

What Is PPC? A Practical Guide to Pay‑Per‑Click Advertising
Pay‑per‑click (PPC) is the “pay only when someone clicks” branch...

Google Search Issues Affecting Results in Some Regions
Google has confirmed a problem with one of its data...

Keyword Counts Dropped After Google’s num=100 Change
In September 2025, Google stopped supporting the &num=100 parameter. This...

Image SEO: Optimize Images for Higher Rankings & Traffic
Introduction Images make your website more engaging, but they can...

.png)
.png)
.png)
.png)
.png)

2024 ALL RIGHTS RESERVED MADE IN INDIA
.png)