HTML Anchor Tag: Creating Hyperlinks and Jump Links
September 9, 2025
Hyperlinks are the backbone of the World Wide Web, and behind every clickable link is the humble HTML anchor tag. With over 25 years in web development and digital marketing, I’ve seen trends come and go, but the anchor tag (<a>) remains an essential tool for building user-friendly, navigable websites.
In this comprehensive guide, we’ll demystify the HTML anchor tag, from basic hyperlink syntax to creating in-page jump links, plus SEO and accessibility best practices – so you can master website navigation and improve user experience. Let’s dive in!
What is an HTML Anchor Tag?

The HTML anchor tag (<a>), also known as the anchor element, defines a hyperlink that connects one location to another on the web. In simple terms, it turns the enclosed text or content into a clickable link.
According to the official HTML specification, “an anchor is a piece of text which marks the beginning and/or the end of a hypertext link”. In practice, that means the text between <a> and </a> becomes either the start of a link (when using an href attribute) or a destination for a link (when using an identifier).
In modern HTML usage, the anchor tag’s most common role is to create a hyperlink to another resource. The MDN Web Docs define the anchor element as follows: “The HTML <a> element (or anchor element), with its href attribute, creates a hyperlink to web pages, files, email addresses, locations in the same page, or anything else a URL can address.”
Content inside the anchor tag should indicate the link’s destination. In other words, users click an anchor tag to go somewhere, be it another webpage, a file download, an email client, or a specific section on the current page.
Key point
If an anchor has an href attribute, it’s an active hyperlink source. If it has certain attributes (historically name, now id), it can mark a destination within a page (more on this later).
In fact, one anchor tag can even serve both purposes (a link that is also a target), though that’s less common. Usually, you will either use <a href=”URL”>Link text</a> to create a link, or <a id=”section-name”></a> to mark a bookmark location.
Finally, note that without any href (or other linking attribute), an <a> tag won’t link anywhere – it will just render as text (or can be used as a placeholder in scripts). As W3Schools notes, if the <a> tag has no href, it’s essentially a placeholder for a hyperlink and not clickable. Now that we know what anchors are, let’s see how to use them to create actual links.
Basic Syntax: How to Create a Hyperlink in HTML

Creating a hyperlink with an anchor tag is straightforward. The basic syntax is:
<a href=”URL”>Link text or content</a>
1. href attribute
This is the Hypertext Reference – the URL or location where the link will point. It can be an absolute URL (like https://example.com/page.html) or a relative URL (like ../page.html or page.html if linking within the same site structure). The href is the only truly required attribute for a functional hyperlink; without it, the anchor won’t know where to go.
2. Link text or content
The text (or image/HTML content) between the opening <a> and closing </a> tags is what users see and click on. This anchor text should ideally describe what you’re linking to (e.g., “Visit W3Schools” or “Download Report”). By default, browsers style this text as blue and underlined for unvisited links (purple for visited, red on active click), signaling to users that it’s clickable.
Example- Basic hyperlink:
<a href=”https://www.w3schools.com”>Visit W3Schools.com!</a>
In the above example, the anchor tag makes “Visit W3Schools.com!” into a clickable link that navigates to the specified URL. If you open this link in a browser, it will load the W3Schools website in the current window or tab by default.
3. Absolute vs. Relative URLs
If you provide a full URL (including http:// or https://), it’s an absolute link to that exact address on the web. A relative link (not starting with http:// or a protocol) points to a resource in relation to the current page. For example, href=”about.html” might link to an About page in the same directory, whereas href=”/support/contact.asp” would link to a specific path on the same domain. Use absolute URLs for external sites, and relative URLs for pages within your own website to maintain flexibility if your domain changes.
Linking to files and other protocols:
The href can point to more than just web pages. It can link to a PDF or image file (which the browser may open or download), or use other protocols:
A. Email: href=”mailto:someone@example.com” opens the default email client to send an email.
B. Telephone: href=”tel:+1234567890″ can prompt to dial a number on smartphones.
C. FTP or others: You could use ftp:// for FTP links, etc., though these are less common now.
D. JavaScript: href=”javascript:alert(‘Hi’);” can execute script on click (generally not recommended for modern best practices – better to use event listeners).
In summary, use the anchor tag with an appropriate href to create hyperlinks that connect your content to the rest of the web or to specific functionality (like launching email or phone calls). Next, we’ll explore how to use anchors to navigate within the same page – creating so-called anchor links or jump links.
Linking to Sections on the Same Page (Anchor “Jump” Links)
Sometimes you want to let users click a link that jumps them to another section of the same page (or a specific spot on a long page). These are often called anchor links, jump links, or named anchors. They’re commonly used for table of contents navigation on lengthy pages, or a “Back to Top” link at the bottom of a page.
To create an in-page jump link, you need two things:
1. An anchor target – a marker at the destination section.
2. A link to that anchor – the clickable link that jumps to the marker.
Here’s how to do it step by step:
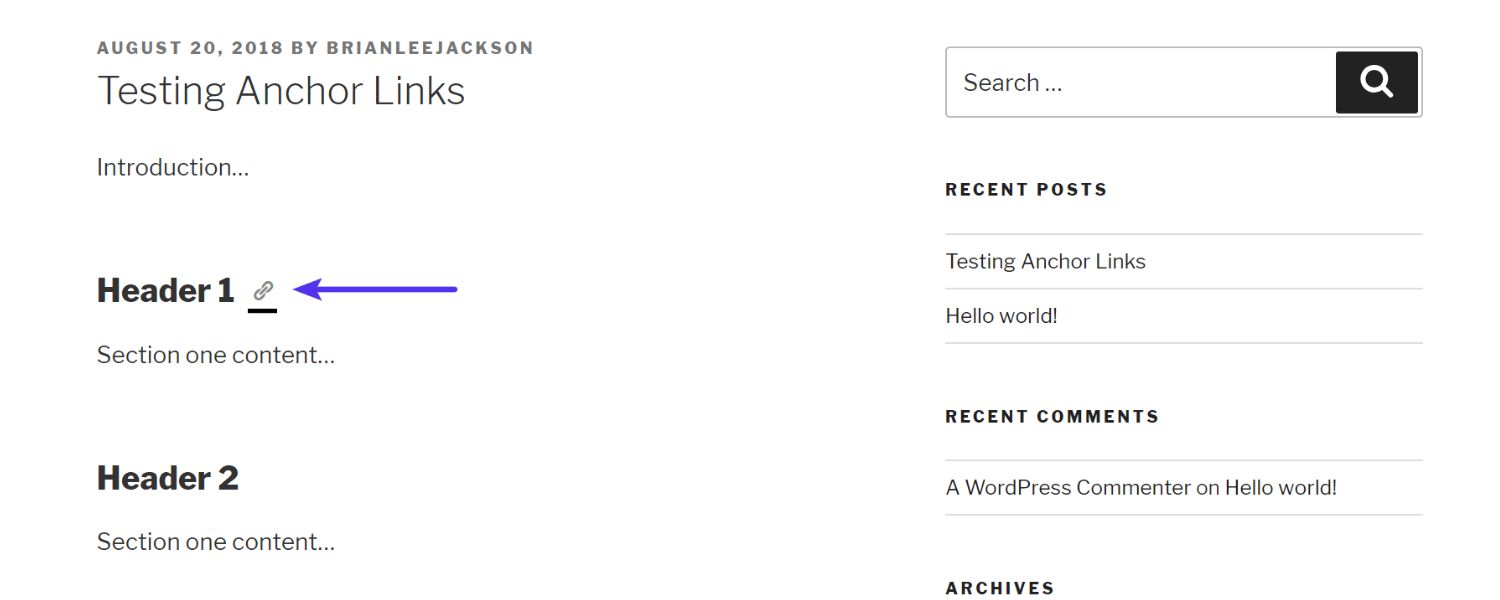
Step 1: Mark the destination with an id.

Add an id attribute to the element you want to jump to (or you can insert an empty <a> tag with an id at that spot). For example, if you have a section heading for “Pricing”, you might write:
<h2 id=”pricing”>Pricing</h2>
This id=”pricing” serves as a bookmark. It should be unique on the page (no other element has the same id). In older HTML, a name attribute on an <a> tag could be used similarly, but that is obsolete in HTML5 – now we use id for anchors.
(In fact, browsers will look for the matching id first when jumping to an anchor, and only fall back to a name if no id is found.)
Step 2: Create the link pointing to that id.

Use the href attribute with a hash (#) followed by the target element’s id.
For example:
<a href=”#pricing”>See Pricing Details</a>
When a user clicks this link, the browser will scroll/jump to the element with id=”pricing”. Essentially, href=”#pricing” means “go to the element with this id in the current page.”
If the id exists, the page will instantly scroll so that the target element is at the top of the viewport (or as close as possible). If the id is on a different page, you can combine it with a URL: e.g., href=”about.html#team” would load the About page and jump to the “team” section on that page.
Step 3: Smooth scrolling (optional)
By default, the jump is instantaneous. If you prefer a smooth scroll effect, you can use CSS (scroll-behavior: smooth; on html element) or JavaScript. This is optional, but can create a nicer user experience instead of a sudden jump.
Here’s a complete example of an anchor jump link in action:
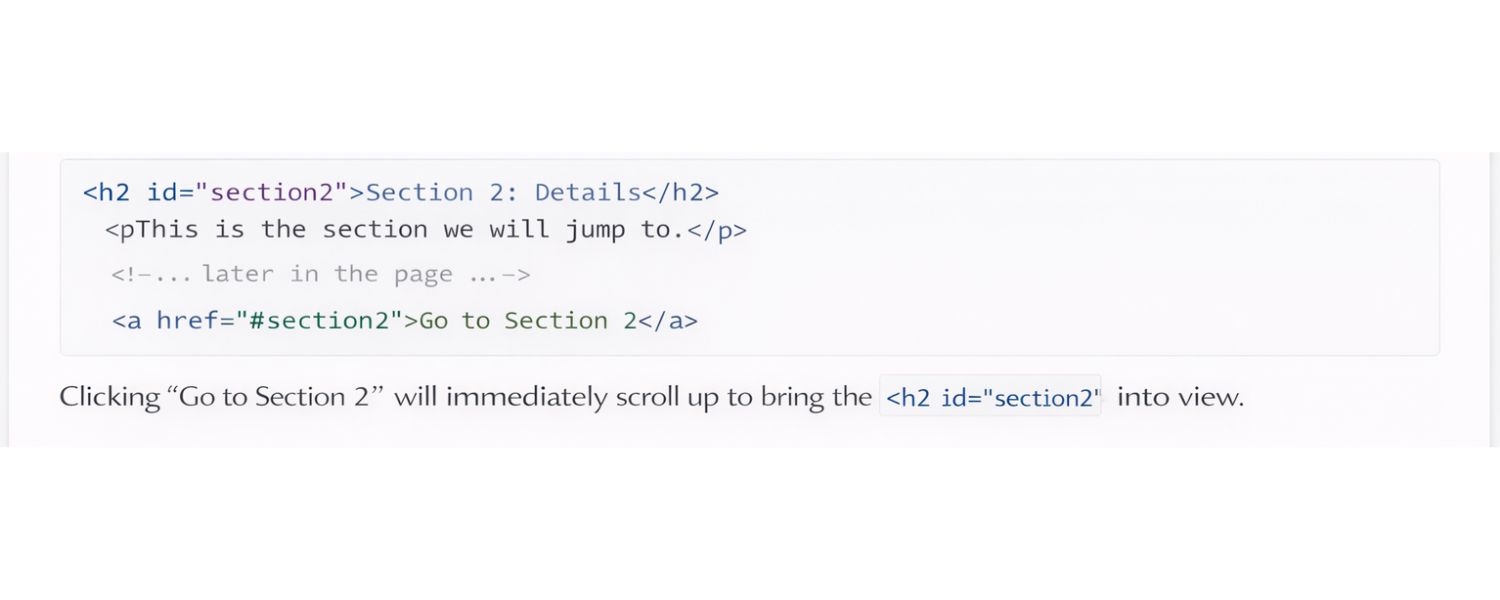
<h2 id=”section2″>Section 2: Details</h2>
<p>This is the section we will jump to.</p>
<!– … later in the page … –>
<a href=”#section2″>Go to Section 2</a>
Clicking “Go to Section 2” will immediately scroll up to bring the <h2 id=”section2″> into view.
Pro Tip:
Ensure your anchor IDs have no spaces and begin with a letter (they can contain letters, numbers, underscores, hyphens, etc.). For example, use id=”pricing-plans” rather than id=”pricing plans” (spaces are invalid in IDs). Also, remember that IDs are case-sensitive and must be unique on the page.
Anchors can also jump to sections on other pages. For instance, <a href=”tutorial.html#step5″>Jump to Step 5</a> will load tutorial.html and then navigate to the element with id=”step5″ on that page. This is a useful way to directly link users to relevant info deep within a page.
Step 4: Troubleshooting anchor links

If your anchor link isn’t working:
A. Double-check that the href fragment (the part after #) exactly matches the target element’s id (spelling and case). If they don’t match, the browser won’t find the target.
B. Make sure the target element is present in the page and has the id before the link is clicked.
C. Remember that browsers will not send the #fragment to the server – it’s handled client-side. So the page must already contain that anchor. (If content is loaded dynamically via AJAX, anchors might not work unless handled in code.)
D. If clicking the link moves the page but the target content is hidden under a fixed header (a common issue), you may need to adjust for that. Browsers try to position the target at the top of the viewport; a fixed navigation bar can cover it.
One solution is to add padding or an offset so the target is scrolled slightly below the header. For example, adding a CSS rule like .anchor-target { scroll-margin-top: 50px; } to provide a top margin when scrolling can help, or simply adding extra padding to the anchored element equal to the header’s height.
Anchor jump links are extremely useful for improving navigation on long pages. They let users skip directly to the content they care about without extra scrolling. As one university web guide puts it, an anchor is like a bookmark in the page that you can link to – for example, a “Back to Top” link or a table of contents that jumps to mid-page sections. Used thoughtfully, these in-page anchors can enhance user experience significantly.
HTML Anchor Tag Attributes Explained
Beyond the basic href, anchor tags support a variety of attributes that control their behavior and provide additional information. Let’s explore the most important ones you should know:
1. href – The Hyperlink Destination

As covered earlier, the href attribute specifies where the link goes – the URL or fragment identifier. This is the key attribute that turns an anchor into a hyperlink. A few additional notes on href usage:
A. It accepts any valid URL. This includes web pages (http:// or https://), in-page fragments (#section), email (mailto:), telephone (tel:), file paths, or even javascript: (though using JavaScript URLs is generally discouraged in favor of event handlers).
B. If href is blank or set to just #, the link will simply point to the top of the current page. Sometimes developers use href=”#” as a placeholder for dummy links (e.g., in templates).
Keep in mind that clicking such a link may cause the page to scroll to top. If you need a placeholder link that truly does nothing, you can use href=”javascript:void(0)” or better, use a <button> element for actions that aren’t actual navigation.
C. If an anchor has no href at all, it isn’t a link. This can be used for naming anchors (older practice with name) or manipulated via JavaScript. But for accessibility, avoid using <a> without href just to style as a button; instead use actual buttons for actions.
Tip: Always ensure your hyperlinks are valid and not broken. Check that the URLs are correct. Broken links lead to poor user experience and can hurt your SEO.
2. target – Where to Open the Link

By default, when a user clicks a link, it opens in the same browsing context (the same tab or window). The target attribute lets you change this behavior:
A. target=”_blank” – opens the link in a new tab (or window, depending on the browser and user settings). Use this for external links where you want to keep the user on your site, or for downloadable resources. Example: <a href=”report.pdf” target=”_blank”>View Report</a>.
B. target=”_self” – the default, opens in the same frame or window. (You usually don’t need to specify this, as it’s the implicit default.)
C. target=”_parent” – if your page is inside an iframe, this opens the link in the parent frame.
D. target=”_top” – opens in the full body of the window, escaping any frames. (This and _parent are less common outside of framed or embedded contexts.)
If you use target=”_blank”, there is an important security consideration: you should add rel=”noopener noreferrer” to your anchor. This prevents a security risk where the new tab could potentially control the original page via window.opener. Modern browsers have mitigated this (for example, some automatically act as if noopener is set when opening new tabs), but it’s still best practice to include it for safety. For instance:
<a href=”https://external-site.com” target=”_blank” rel=”noopener noreferrer”>External Site</a>
This way, you ensure opening in a new tab does not inadvertently expose your window context to the new page.
3. rel – Relationspagehip Hints (and SEO considerations)
The rel attribute describes the relationship of the linked page to the current page. It’s primarily used for SEO or browser hints. Some common values:
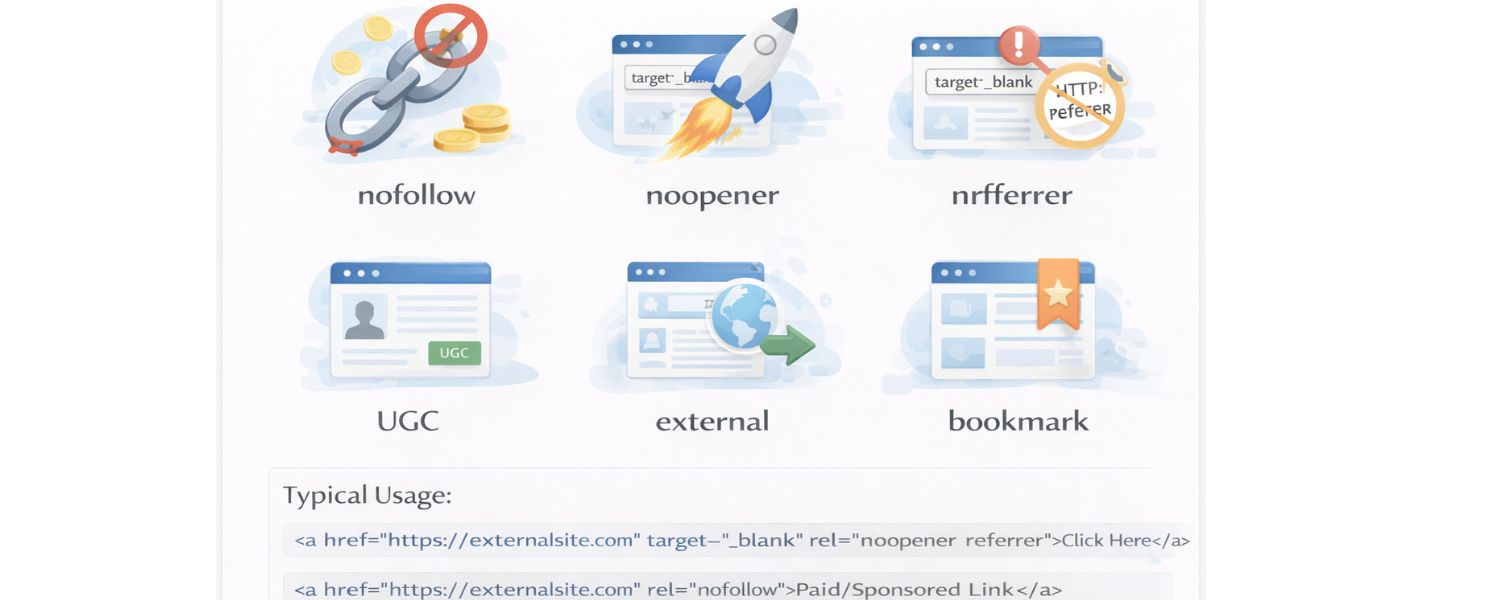
A. nofollow – tells search engines not to follow this link for ranking purposes. Use this when linking to untrusted content or paid/sponsored links to avoid influencing search rankings.
B. noopener – (as mentioned) improves security with target=_blank links by preventing access to window.opener.
C. noreferrer – similar to noopener but also instructs the browser not to send a HTTP referrer header when the link is clicked.
D. ugc – marks the link as user-generated content (like in comments or forums).
E. external – hints that the link points to an external site.
F. bookmark – indicates the link is a permalink (may be used for in-page anchors).
G. Many others exist (like prev/next for pagination, author, etc.), but these are less commonly needed.
For typical usage: If you want to open a link in a new tab, always include rel=”noopener noreferrer” and use the URL. If you are linking out to an external site and want to avoid passing SEO “link juice,” add rel=”nofollow”. These attributes don’t change user behavior but communicate with browsers and search engines behind the scenes.
4. id (and the obsolete name) – Anchors and Identifiers

We discussed using the global id attribute to create anchor targets for in-page navigation. To reiterate:
A. Use id=”someName” on an element (or an empty <a> tag) to define an anchor point that links can jump to.
B. Each id on a page should be unique.
C. The name attribute on anchors was used in older HTML (e.g., <a name=”someName”></a> to mark a spot). HTML5 deprecated name on anchors, so stick to id. (Browsers still support named anchors for backward compatibility, but it’s better to use id – which also has broader use since any element can have an id.)
In summary, to create an anchor/jump link, you might have: <h3 id=”faq5″>How do I register?</h3> as the target, and somewhere else <a href=”#faq5″>Jump to FAQ 5</a>. When clicked, the browser finds id=”faq5″ and scrolls to it.
5. title – Advisory Tooltips

The title attribute on an anchor provides additional advisory information. If you include a title, many browsers will show its text as a tooltip when users hover over the link. For example:
<a href=”https://example.com” title=”Visit Example.com for more info”>Our Partner Site</a>
This might show “Visit Example.com for more info” on hover. However, use title sparingly. It’s not always read by screen readers (and sometimes over-read, causing redundancy).
It should never be a substitute for clear anchor text. In many cases, a well-written anchor text negates the need for a title. (Also, on touch devices, title text isn’t accessible since there’s no hover.)
6. download – Prompt a File Download
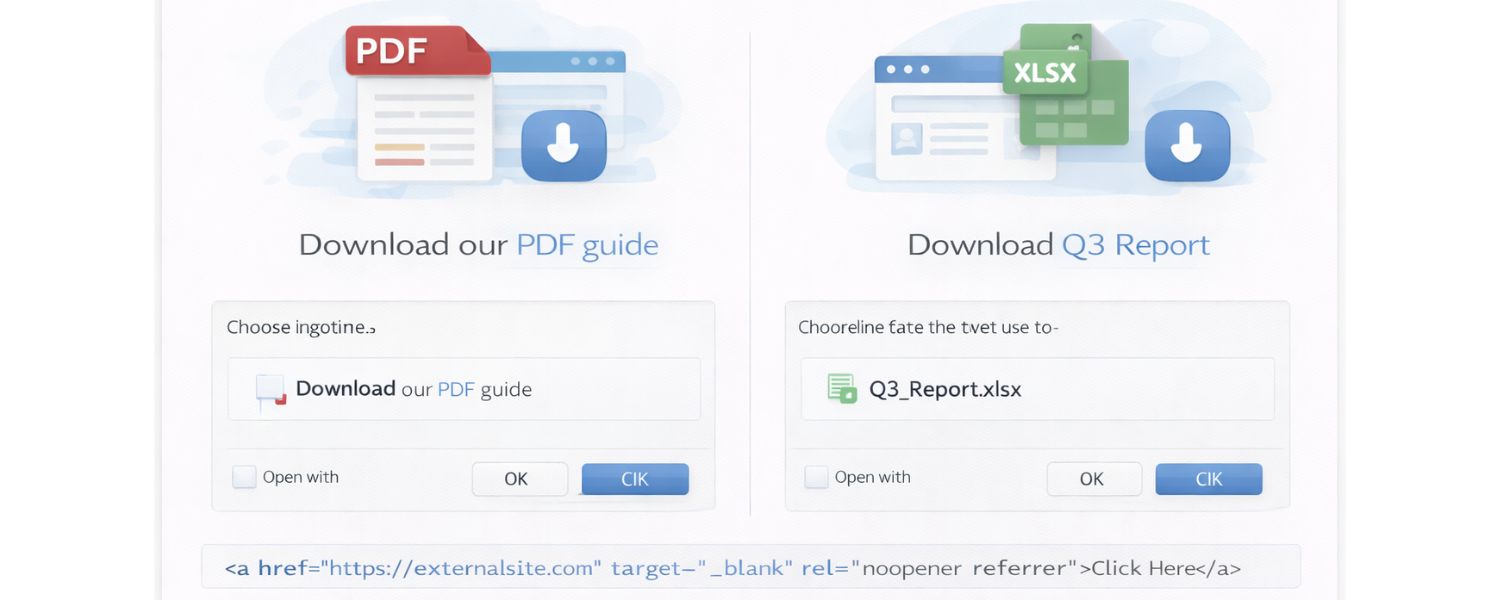
HTML5 introduced the download attribute. If you set download on an anchor tag that links to a resource (like a file), it tells the browser that this link is for downloading, not navigating. For example:
<a href=”guide.pdf” download>Download our PDF guide</a>
When clicked, instead of trying to display the PDF in the browser, it will typically prompt the user to save the file (or save automatically). You can optionally provide a filename: <a href=”report.xlsx” download=”Q3_Report.xlsx”>Download Q3 Report</a>, and the browser will suggest that name for saving.
A note:
The download attribute mainly works for same-origin URLs or data/blob URLs. If it’s a cross-domain link, some browsers might ignore download for security reasons. But for most cases (linking to your own files), it’s a handy attribute to trigger downloads.
7. Other Attributes and Advanced Uses
There are a few less common attributes that anchors can use:
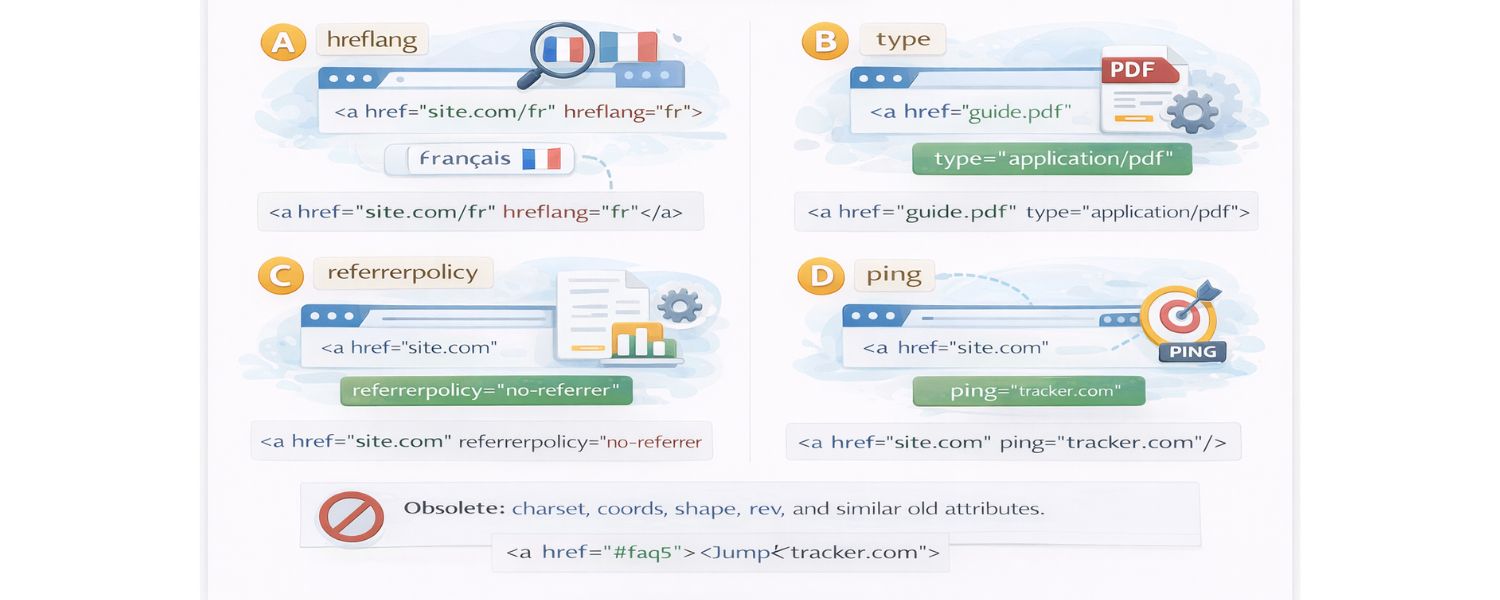
A. hreflang – specifies the language of the linked resource (e.g., hreflang=”fr” if the target page is in French). This can help search engines or accessibility tools but has no visual effect.
B. type – hints at the MIME type of the linked resource (e.g., type=”application/pdf” for a PDF link). This is rarely used today, as browsers typically infer the type from the URL/headers.
C. referrerpolicy – allows control over the referrer info sent (similar to the noreferrer rel value, but more granular).
D. ping – lets the browser send a POST request to a given URL when the link is clicked, usually for tracking purposes. For instance, <a href=”https://example.com” ping=”https://tracker.com/log-click”>…</a>. This is an advanced feature and not commonly needed unless you’re doing special analytics.
E. Obsolete: charset, coords, shape, rev, etc., are old attributes related to things like image maps or reverse link relationships. You won’t use these in modern HTML5.
For most developers and content creators, the main anchor attributes you’ll work with are href, target, rel, id/name, and occasionally title or download. Now that we’ve covered how anchors work and their attributes, let’s look at best practices to ensure your links are effective, accessible, and SEO-friendly.
Best Practices for Using Anchor Tags (SEO & Accessibility)
Using anchor tags is not just about getting the syntax right – it’s also about crafting a good user experience and aiding search engines and assistive technologies. Here are some best practices and tips, honed from decades of experience, to get the most out of your hyperlinks:
1. Use Descriptive Anchor Text

The clickable text of the link should clearly indicate what the user will get if they click it. Avoid generic phrases like “click here” or “read more” that don’t convey anything about the destination.
Instead, make the text self-contained and meaningful. For example, “Download the Annual Report (PDF)” is better than “Click here” for download. Descriptive links help all users – including those using screen readers or voice search – to understand the context.
They also help search engines understand the content of the page you’re linking to, which can indirectly benefit SEO. (Think of anchor text as a label for the link’s target.)
2. Indicate Link Purpose/Behavior
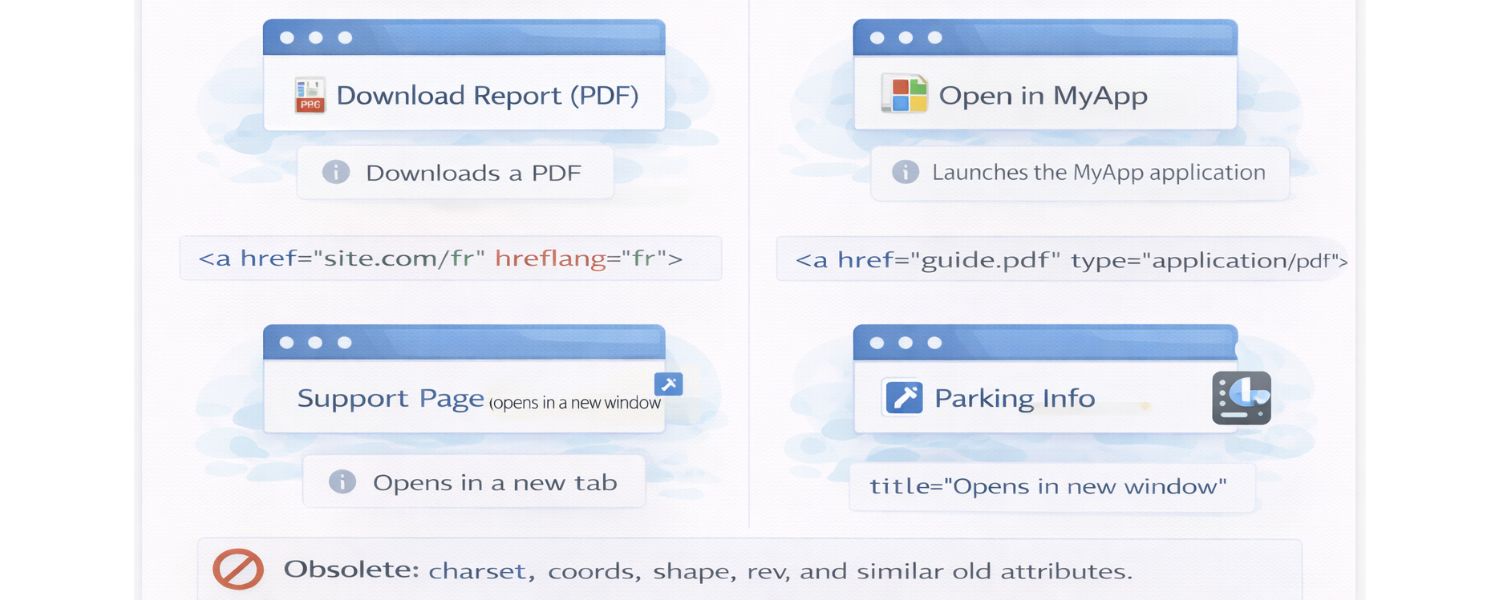
If a link does something non-obvious, consider informing the user. For example, if a link opens a PDF or launches an app, you might mention that in the link text (e.g., “Download Report (PDF)” or “Open in AppName”).
Similarly, if a link opens in a new tab (via target=”_blank”), some experts suggest indicating that (like an icon or text “new window”) for clarity. At minimum, ensure that the link’s context or the title attribute makes it clear if needed.
3. Don’t Surprise the User
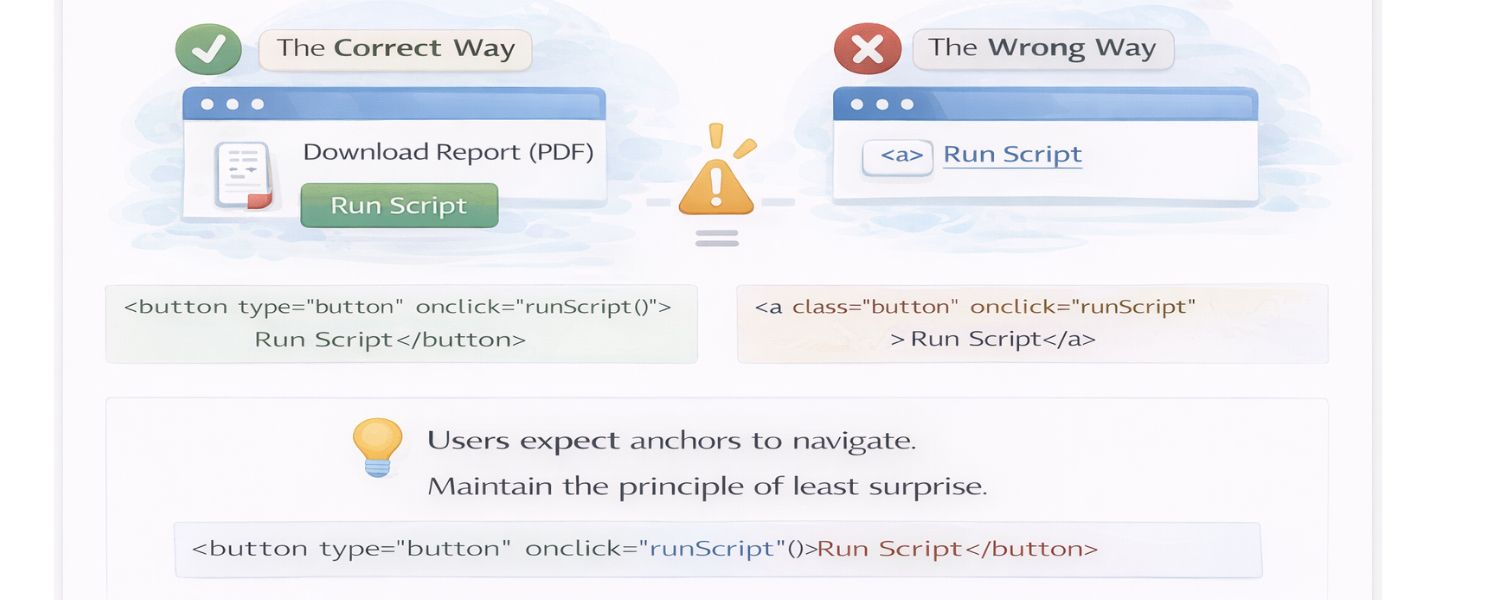
Avoid using anchors for things that are not actually links. For instance, don’t use an <a> tag styled as a button to trigger JavaScript (without href) unless necessary – a <button> element is semantically appropriate for actions.
If you must use an anchor as a button (perhaps for styling consistency), give it a role or href=”javascript:void(0)” to prevent page jumps, and be sure to manage focus and accessibility properly. The key is to maintain the principle of least surprise: users expect anchors to navigate, so use them for navigation.
4. Open New Tabs Sparingly

While opening external links in new tabs (_blank) can keep users on your site, use this judiciously. Some users dislike having new tabs spawned without their consent. Generally, reserve new tabs for content that is outside your site or for long, downloadable documents, so the user doesn’t lose their place on your site. As mentioned, always pair target=”_blank” with rel=”noopener noreferrer” for security purposes.
5. Ensure Links Are Visible and Stand Out
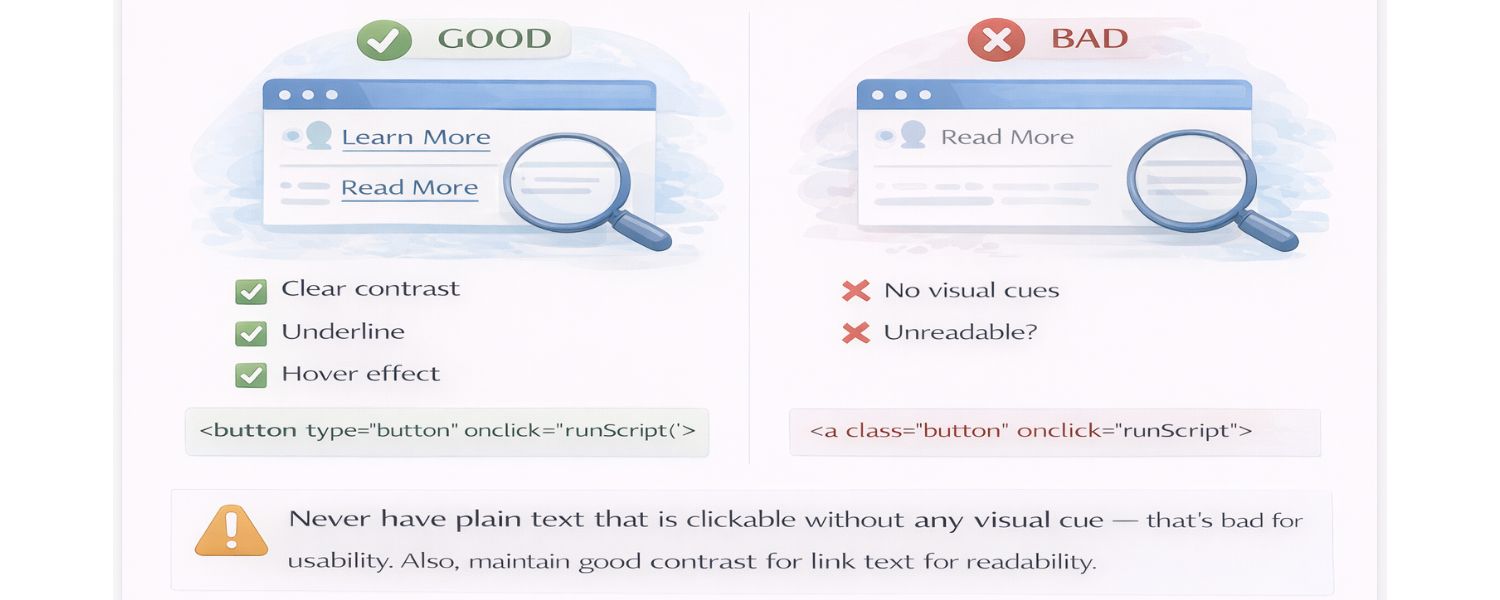
Style your links in a way that users can easily identify them. By default, browsers underline links and color them (blue/purple). If your design changes link styles (which is common in modern web design), make sure there’s still a clear visual indicator (underline, different color, hover effect, etc.).
Never have plain text that is clickable without any visual cue, that’s bad for usability. Also, maintain good contrast for link text for readability.
6. Provide Hover/Focus Feedback

For usability, links should have some visual feedback when hovered or focused (using CSS :hover, :focus pseudo-classes). For example, they might change color or underline state. This helps users using keyboard navigation to see which link is focused when tabbing through a page.
7. Check and Fix Broken Links
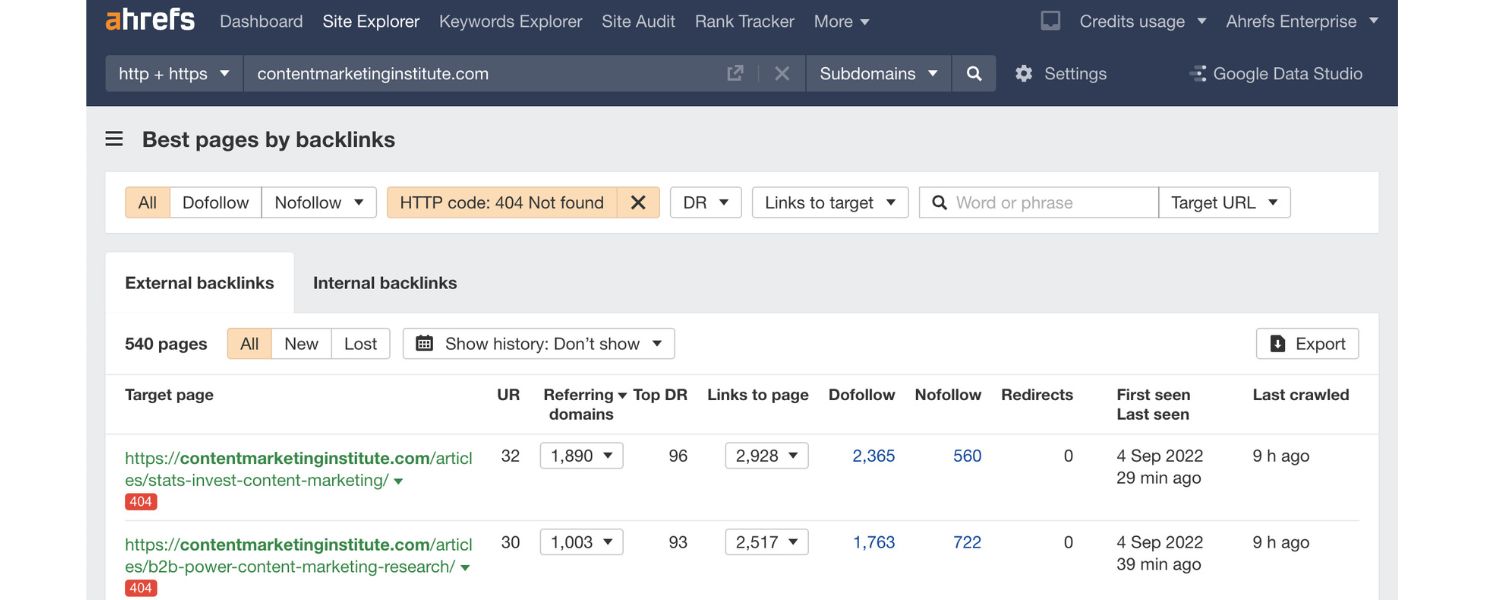
Periodically verify that your anchor href targets are still valid. Nothing frustrates a user like clicking a link and getting a 404 error or wrong content. Use link checking tools or plugins to catch broken links on your site, and update or remove them.
8. Anchor Links and Fixed Headers
As noted earlier, if your site has a fixed header (like a persistent top menu bar), in-page anchor links might scroll the target section under the header. A best practice is to add some CSS to mitigate this.
For example, if your header is 60px tall, you can give anchor target elements a padding-top of 60px and a negative margin of -60px (or use scroll-margin-top: 60px in CSS on those target elements). This ensures that when the browser scrolls to the anchor, the section’s title isn’t obscured under the header.
9. SEO Considerations – Internal Linking

Anchors are crucial for SEO in terms of internal linking structure. When you mention relevant content on another page of your site, link to it with a descriptive anchor text. This helps search engines understand the relationship between your pages and can pass ranking signals.
Also, having a table of contents with anchor links on long pages can sometimes yield “jump to section” links in Google’s search results. Google has been known to index on-page anchors and even display them as quick links in snippets when it finds them useful.
For instance, a search result might show a main link and beneath it, “Jump to: [Section Name].” To increase the chances of this, structure your page with clear sections, use descriptive ids, and perhaps include a mini TOC with those anchor links.
It not only helps users on your page but can enhance your snippet in search results (making it more likely people click through to the specific section they need).
10. Accessibility – Think of All Users
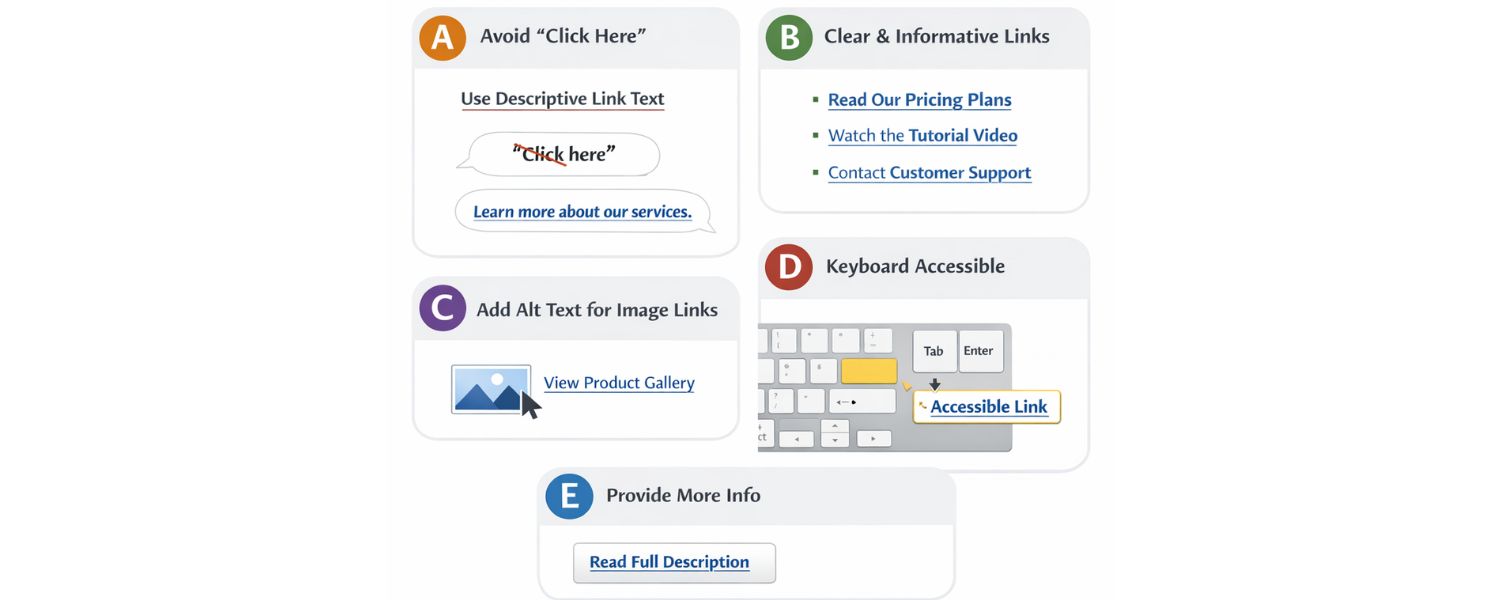
Visually impaired users often navigate via links, sometimes pulling up a list of all links on the page. Therefore:
A. Again, avoid non-informative link text (no “click here” on its own), it’s especially unhelpful when heard out of context.
B. Each link’s purpose should be clear from its text alone or with minimal surrounding context.
C. If your link is an image, provide alt text for the image (the alt serves as the anchor text for screen readers). Don’t leave an image link with empty alt, that would be an “empty link” which is confusing.
D. Ensure keyboard accessibility: a user should be able to tab to every link and press Enter to activate it. Don’t remove the default focus outline unless you replace it with an obvious custom focus style.
E. For very long descriptions, consider using adjacent text or a description link rather than overloading link text or title. But that goes beyond the scope here.
11. Avoid Overlinking

While links are great, too many links can be distracting. Don’t hyperlink every other word – use them meaningfully, for navigation or reference. Also, multiple links on the same page with the exact same text should ideally lead to the same place; otherwise it can be confusing (for example, three different “Learn more” links going to different URLs – better to make each one specific, like “Learn more about Plan A”, “Learn more about Plan B”, etc.).
12. No Anchors Within Anchors
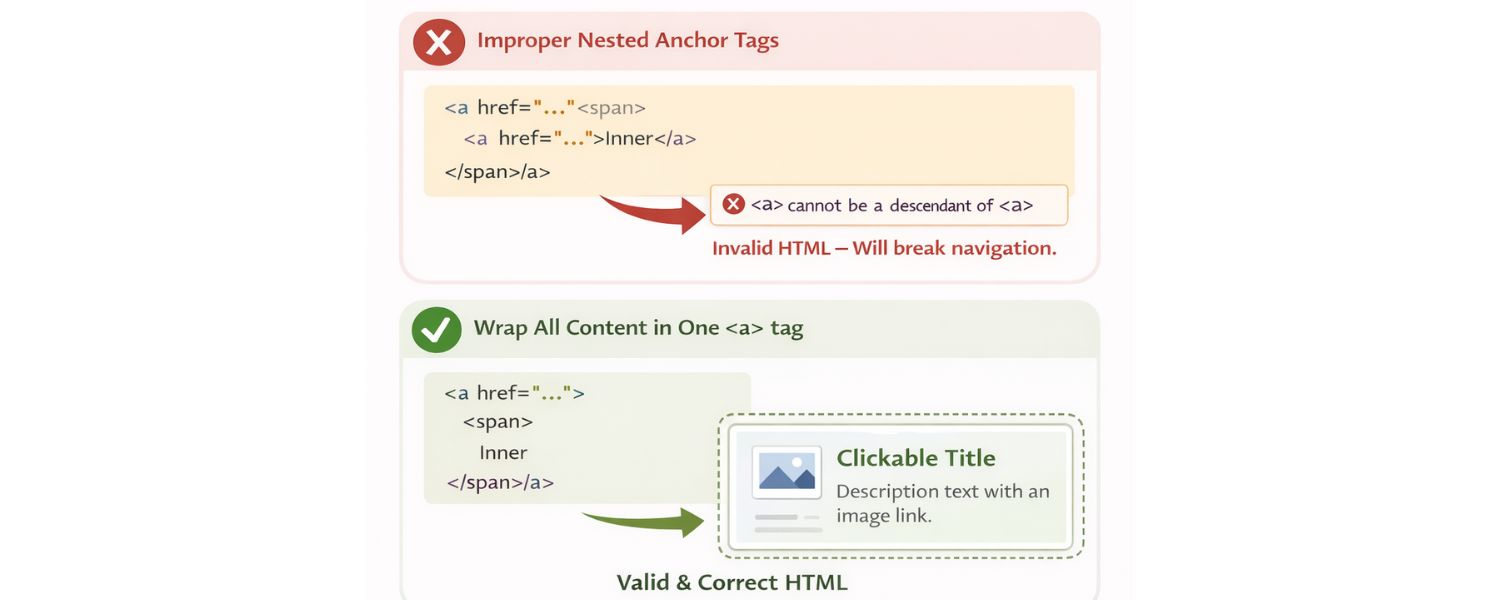
HTML does not allow nesting an <a> tag inside another <a>. It will break the HTML structure. If you need a complex clickable area, wrap the needed content in one single anchor tag rather than trying to nest them.
For example, don’t do <a href=”…”><span><a href=”…”>Inner</a></span></a> – the inner anchor will likely invalidate the outer.
By following these best practices, your anchor tags will not only work correctly but also contribute to a better user experience and potentially improved SEO. You’ll make content easier to navigate for everyone – users, search engine crawlers, and assistive technologies alike.
Frequently Asked Questions about HTML Anchor Tags
Q1: Is an “anchor tag” the same as a “link tag”?
In casual conversation, people might say “link tag” to mean an anchor (<a>). However, in HTML terminology, the anchor tag is <a>, used for hyperlinks. There is also a <link> tag in HTML, but that one goes in the <head> (not visible to users) and is used to link external resources like CSS files or define relationships (like <link rel=”stylesheet” href=”style.css”>).
So technically, the anchor tag (<a>) is what creates links in the page. The so-called “link tag” in HTML is a different element used for other purposes. If you see references to anchor vs link tag: just remember <a> is for clickable hyperlinks in the content, whereas <link> is for non-clickable resource linking.
Q2: How do I make an anchor open in a new tab or window?
Use the target attribute on your anchor. For a new tab, set target=”_blank”. Example: <a href=”https://example.com” target=”_blank”>Visit Example</a>. Keep in mind to add rel=”noopener noreferrer” for security when using _blank.
With that, the link will open in a new browser tab (or window if the browser is configured that way). There’s no way to force a link into a new window specifically (that’s user-agent dependent), but _blank does one or the other. Also note, users can always choose to open in new tab via right-click or ctrl+click even if you don’t set a target.
Q3: How can I link to a specific part of another webpage?
You can link to a specific section of another page by using a fragment identifier (anchor) in the URL. First, that other page needs to have an element with an id (or name) to jump to.
For example, if another page has <h2 id=”overview”>Overview</h2>, you can link to it like so: <a href=”otherpage.html#overview”>See the Overview on that page</a>. When clicked, the browser will go to otherpage.html and then scroll directly to the “Overview” section.
This works similarly within your own page, but it’s a great way to directly reference sections in long pages (like FAQ entries, documentation sections, etc.). Just ensure the external page’s IDs are known and stable. If you control both pages, consider adding obvious ids to important headings to enable deep linking.
Q4: Why are my anchor jump links not aligning correctly (the target heading is hidden under my header)?
This is a common issue when using a fixed header or navigation bar at the top of the page. By default, when you jump to an anchor, the browser positions that element at the very top of the viewport. A fixed header can cover it. To fix this, you have a few options:
A. Add some padding or spacing above the target element, or use CSS scroll-margin-top on the target element equal to the header’s height. This way, the element will stop scrolling before it reaches the absolute top, leaving it visible below your header.
B. Alternatively, you could use a small invisible placeholder anchor just before the target. For example: <a id=”anchor-top”></a><h2>Section Title</h2> and maybe style that anchor to have display:block; padding-top:50px; margin-top:-50px; (if 50px is your header) – this is an old trick to offset anchor positions.
C. The simplest modern way is indeed CSS: #yourTargetId { scroll-margin-top: 50px; } if supported, or just giving that section extra top padding in your design.
In short, account for any fixed elements by creating an offset.
Q5: Can I use an image or button as a link?
Yes. If you wrap an <img> tag inside an <a>, the image becomes clickable. Example: <a href=”home.html”><img src=”logo.png” alt=”Home”></a> would make a linked logo that leads to the homepage. Just remember to always include an alt attribute on images so that there’s descriptive text for screen readers (that alt text effectively becomes the anchor text).
For buttons, if you want a button that actually navigates somewhere, you can style a link to look like a button via CSS. Or you can use a <button> with JavaScript to change window.location.
But if it’s purely a navigation action (like “Next page”), an anchor tag is semantically appropriate. If it’s an action (like “Submit Form” or “Open Modal”), a <button> is better. You can certainly style anchors and buttons however you want, but keep their fundamental purposes in mind for clarity.
Q6: How do I disable a link or make an anchor unclickable?
There is no dedicated disabled attribute for anchor tags like there is for form inputs. If you want to visually disable a link (and prevent clicking), you have a few approaches:
A. Remove the href attribute. No href means it’s not clickable (though it may still appear styled as a link unless you adjust the CSS). This is straightforward, for example, <a id=”link1″>Link Name</a> with no href won’t do anything on click.
B. Use CSS pointer-events: you can add style=”pointer-events: none; cursor: default;” to an anchor to prevent clicks. It will still be visually styled as a link unless you also change that style.
C. Use JavaScript to intercept clicks (e.g., onclick=”return false;” or event listeners), not recommended for simple cases.
However, consider why you want to disable a link. If it’s something like “currently unavailable” action, it might be better to not render a link at all, or indicate clearly that it’s not active (perhaps using a <span> instead of <a> for that item, styled similarly but not clickable).
There is also the approach of using href=”javascript:void(0)” or href=”#” and then preventing default behavior, but those still create clickable focusable elements which might confuse users if not truly functional. So the cleanest approach: no href (and style accordingly), or use CSS to nullify clicks.
Q7: What are “named anchors” and are they still used?
“Named anchor” is a term from earlier web days referring to using the name attribute on <a> to mark a spot in the page. For example, old HTML might have <a name=”top”></a> at the top of a page and a link <a href=”#top”>Back to top</a>.
This still works in HTML5 for backward compatibility, but the modern standard is to use id instead. So you’d do <div id=”top”></div> or <h1 id=”top”>Title</h1> and the same <a href=”#top”>…</a> link. So yes, named anchors (anchor with name) have essentially been replaced by element IDs.
When someone talks about “anchor links”, they usually mean any jump link to a section on a page (using an id). So, you should use IDs for any new content, it’s cleaner and future-proof.
By following this guide, you should be well-equipped to use HTML anchor tags effectively, making your websites easier to navigate and more engaging. From simple outbound hyperlinks to internal table-of-contents links, the anchor tag offers a powerful yet simple way to connect content. Remember that small details like link text and proper attributes can make a big difference in usability and SEO.
Google Search Issues Affecting Results in Some Regions
Google has confirmed a problem with one of its data...
Keyword Counts Dropped After Google’s num=100 Change
In September 2025, Google stopped supporting the &num=100 parameter. This...

Image SEO: Optimize Images for Higher Rankings & Traffic
Introduction Images make your website more engaging, but they can...

Share of Voice: Definition, Measurement & Boosting Brand
Share of Voice (SOV) is a key marketing metric that...

Programmatic SEO: Ultimate Guide to Scaling Organic Traffic
Programmatic SEO is an automated SEO technique that uses templates...

.png)
.png)
.png)
.png)
.png)

2024 ALL RIGHTS RESERVED MADE IN INDIA
.png)